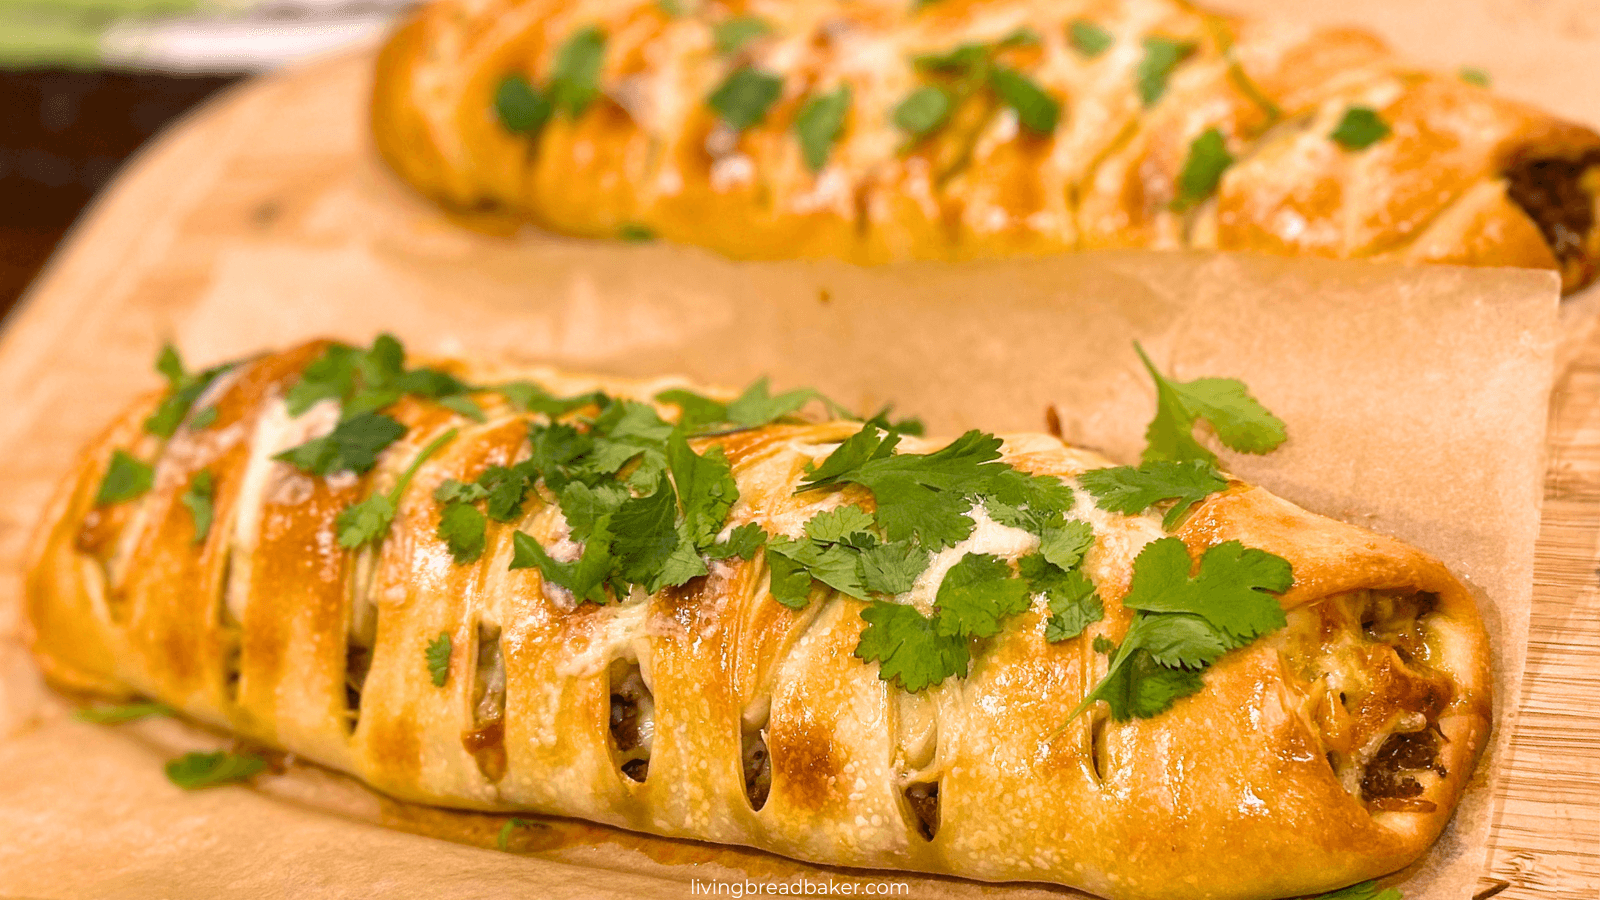
Sourdough Meat Filled Braided Bread (easy dinner recipe)
This Sourdough Meat Filled Braided Bread is a huge crowd pleaser for a savory dinner.
The version we enjoy most is a braided taco bread, but there are many ways to customize and enjoy this recipe so be sure to check out the variations and notes at the end.
The dough for this recipe is soft, flavorful and easy to make. It combines so perfectly with the savory filling!
Ingredients for Sourdough Meat Filled Braided Bread
This recipe makes 2 large Stuffed Bread Breads which will feed approximately 4-6 people with hearty portions (smaller portions as an appetizer will yield more servings).
Here are the ingredients you will need:
- Starter preparation
- 15-20g (1 T.) sourdough starter
- 60 grams (7 tablespoons) all-purpose flour or bread flour
- 60 grams (1⁄4 cup) water
- Dough
- 100g whole milk, warmed (see step 2)
- 40g water
- 30g sugar
- 100g active sourdough starter
- 375g all purpose flour (see tips)*
- 7g (1 t.) salt
- 1 egg
- 45g (3 T.) unsalted butter, softened
- Filling
- 1 lb. ground meat (I prefer lean ground beef)**
- 1 T. seasoning mix (for taco bread, I use my Mexican Seasoning blend)
- 1/2 cup grated cheese (Monterey Jack or Cheddar are typically my choice for taco bread)
- optional: diced onions, bell peppers, and/or mushrooms (see tips in notes below)***
- Topping
- Egg for egg wash
- Optional: additional grated cheese, poppyseeds, sesame seeds, or other topping
*All-purpose flour creates a soft dough for this recipe. Typically I use bread flour, but the all-purpose creates a better texture in this recipe. Bread flour works fine too.
**Ground meat must be cooked and COOLED before assembling your bread.
***For best results, saute the vegetables and completely cool them before adding to the bread. However, I have added raw in a pinch but placed them between the layer of meat and shredded cheese to try to limit any direct contact with the dough to keep the vegetables from sogging the dough while its proofing. 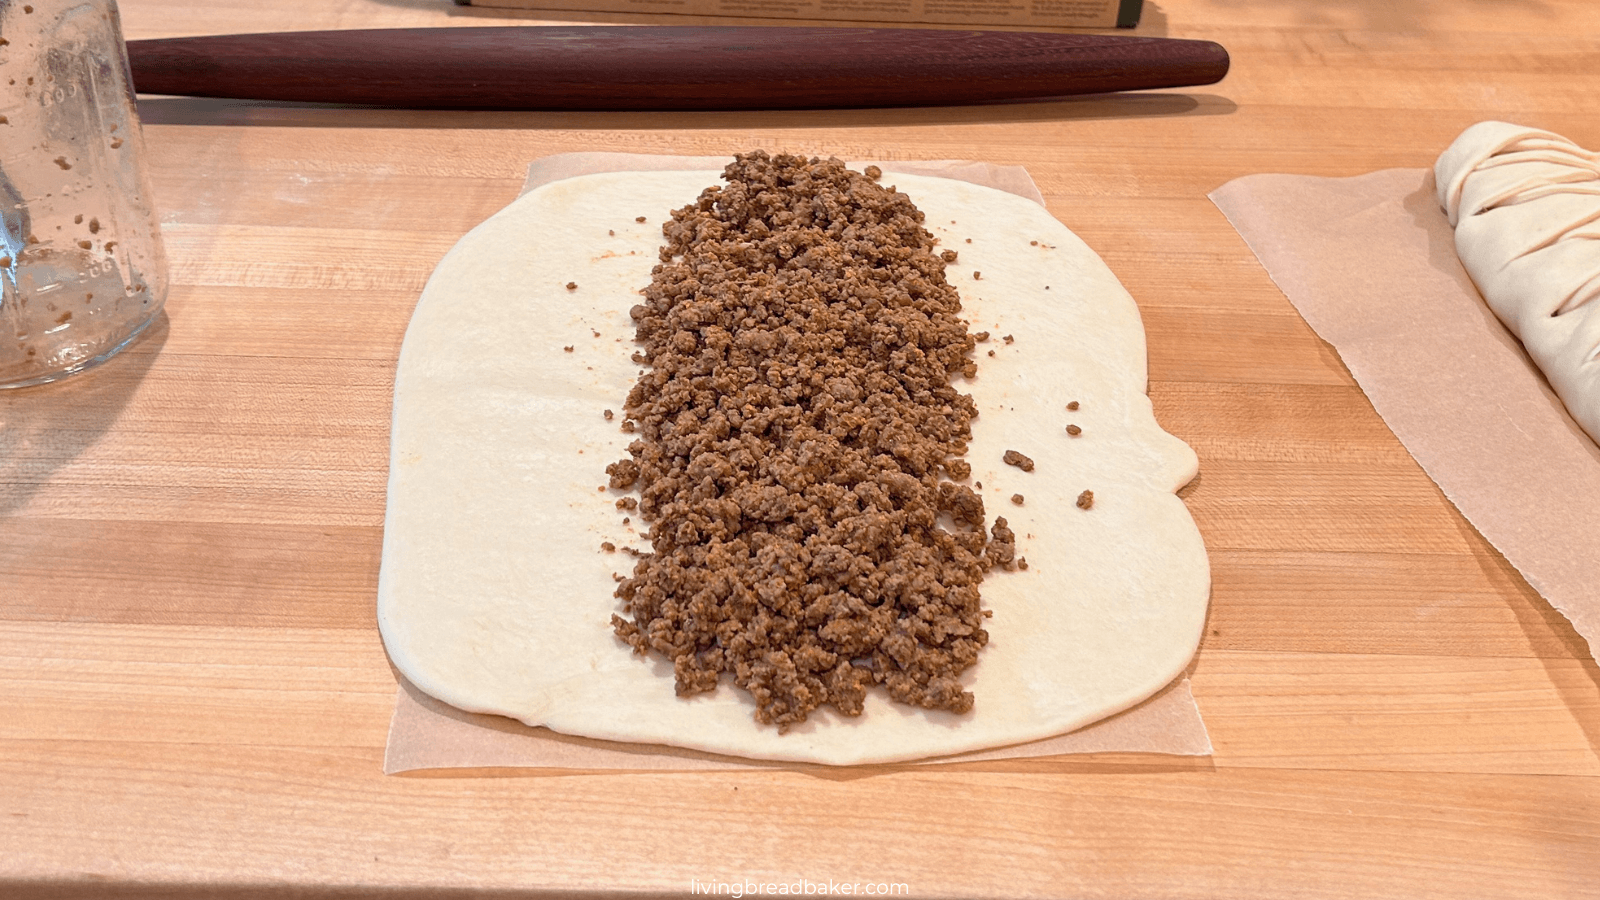
Tools to make Sourdough Meat Filled Braided Bread
Here are some tools you’ll need to make this recipe:
- Large Bowl or stand mixer
- Glass measuring carafe for holding scalded milk
- Rounded plastic dough scraper
- 4-qt Cambro container for bulk fermentation
- Cooking spatula
- optional: Flour duster shaker easy to use for shaping to get just right coverage and not too much flour
- Rolling pin, tapered or French style (This made in the USA crafted rolling pin from Earlywood Designs is my favorite)
- Rolling pizza cutter tool
- Baking pans
- Parchment Paper
- Pastry Brush
- Plastic Wrap
- Silicone Oven Mitts
- Cooling Rack
See the full list of my recommended essentials here: Amazon idea list of Sourdough Essentials (see affiliate disclosure)
Timing for Sourdough Meat Filled Braided Bread
- Activating the Starter: 6-12 hours
- Mixing the dough: 15-30 minutes
- Bulk Fermentation: 4-8 hours (room temp)
- Tasks to complete during bulk:
- Cooking the Filling Ingredients: 10-20 minutes
- Cooling Filling Ingredients: 30-60 minutes*
- Tasks to complete during bulk:
- Shaping: 15-30 minutes
- Proofing: 1-2 hours
- Baking: 25-30 minutes
- Cooling: 10-30 minutes
What is a Master Recipe?
A master recipe is a base recipe that is really versatile.
One master dough recipe can transform based on fillings added, toppings added, the shaping techniques used, and baking method.
The base enriched dough is my Sourdough Sweet and Soft Bread Master Recipe so it is easy to make and very adaptable. It is my favorite recipe for making unique sourdough creations that seem complicated but really aren’t with this master recipe!
Here’s a video of the master dough recipe:
This base dough can be used for so much more! Check out more ideas for how to use this versatile dough here:
How to make a Sourdough Meat Filled Braided Bread
The process of making this savory sourdough recipe has the following steps: Starter preparation, Ingredient Prep, Making the dough, Kneading, Bulk fermentation, Shaping, Proofing, Baking, Cooling.
Sourdough Starter Preparation
You will need a healthy, established sourdough starter for making this recipe. If you need to buy one or make one, here are my resources to get started!
For the starter needed to make the dough, add one tablespoon of either active starter or discard to a 1-pint container.
Feed it with water and all-purpose flour.
Let it sit at room temperature for 6 to 12 hours until it doubles in size, develops large bubbles, and smells fruity. The timing varies depending on your kitchen conditions.
Learn more about sourdough starters in these posts:
Want more sourdough starter info?
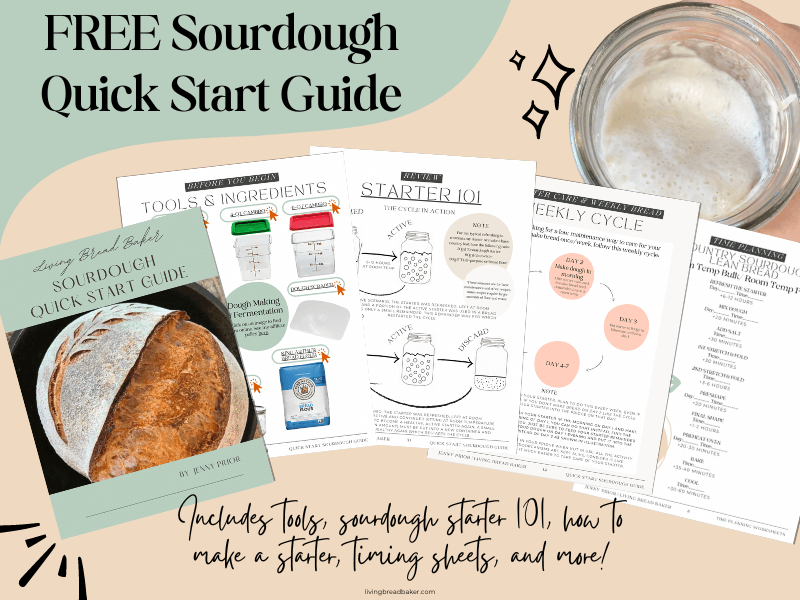
You can get my free Quick Start Sourdough Guide to begin learning some of the key parts of the cycle of sourdough starter.
Learn the phases, the signs of an active, how to care for a sourdough starter to keep it alive and thriving, as well as how to make your own sourdough starter.
Also, learn more about sourdough starters in these posts:
Ingredient Preparation
Once your sourdough starter is active, prepare the milk.
Add more whole milk than the recipe calls for to allow for evaporation. Heat the milk over medium to medium-high heat until it is steaming and proteins begin to stick to the pot. Temperature will be 130 to 140 degrees F. Don’t let it foam.
Transfer 100g of your scalded milk to the bowl of a stand mixer, large bowl, or a separate glass carafe to cool down to 90-100 degrees F.
Making the Bread Dough
Once your milk is cooled and in the bowl of a stand mixer or large mixing bowl, add the water, the sugar, 100g of the active starter, and flour mixture. Stir with a dough hook attachment about 4 times around the bowl or with a large spoon if you are mixing by hand for 1 to 2 minutes until ingredients are beginning to combine and it looks like a shaggy dough mixture. Add the egg* (*the master recipe also includes vanilla extract, but I leave it out for this savory recipe. It doesn’t impact the texture of the final dough).
Continue mixing the dough until it becomes completely combined and soft. Make sure to scrape your mixing bowl with a bench scraper at various points.
Kneading the Bread Dough
Once all the ingredients except the softened unsalted butter are added, it is time to knead your dough into a smooth, soft ball.
When using a stand mixer, use low to medium-low speed (I recommend the lowest 2-3 speeds) to knead your dough. It will take 5 to 8 minutes to get combined and soft until it pulls away cleanly from the sides of the bowl. Kneading by hand will take 8 to 12 minutes.
Now, it is time to knead in the softened unsalted butter. Add it one tablespoon at a time with kneading in between each addition.
Continue kneading until the butter is completely incorporated into your dough and it pulls away cleanly from the sides of the bowl or kneading surface and is a soft smooth ball.
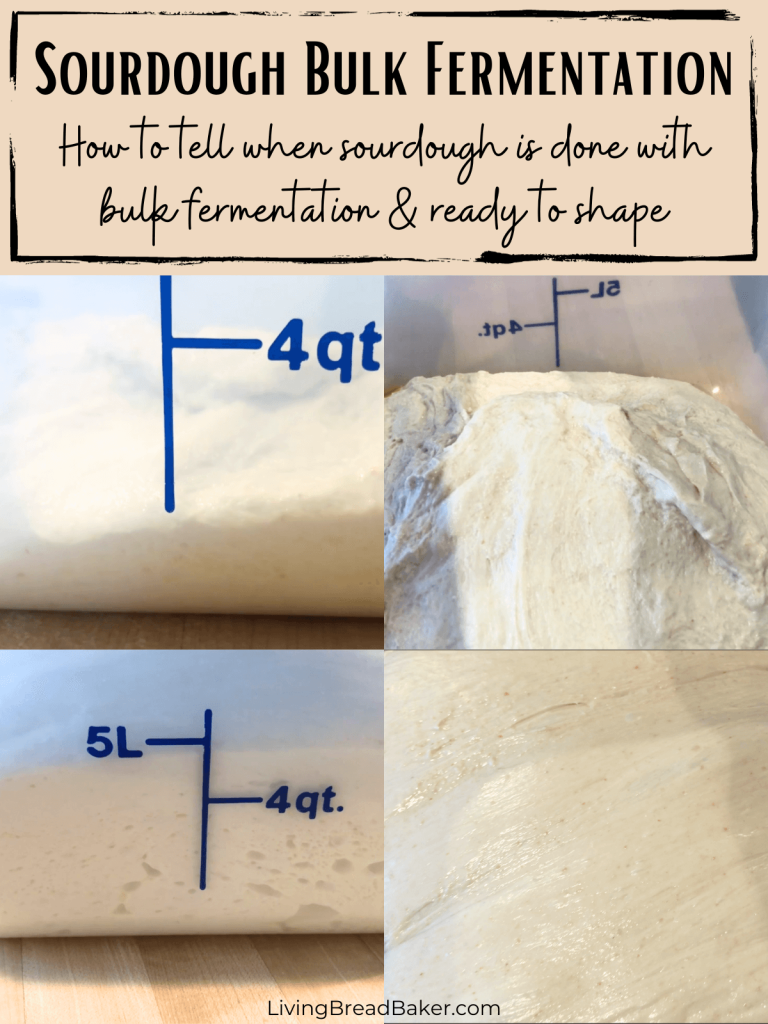
Bulk Fermentation for Sourdough Stuffed Savory Bread
Place the dough in an airtight container or cover a large bowl with plastic wrap. I recommend a 4-qt Cambro container for bulk fermentation.
Let the dough rise at room temperature for 4 to 8 hours until it doubles. Ideally, find a warm place in your kitchen for the dough to rest.
If you’d like to do a long, cold fermentation, place in the fridge for 20-48 hours until doubled in volume.
For more details on this stage, see this post: How to tell when sourdough is done with bulk fermentation
Baking Sheet Prep
Prepare one or two baking sheets by lining each baking sheet with parchment paper.
For easier prep, I recommend using one piece of parchment paper for each braided bread. You can cut one in half to shape each bread individually on one and then place both onto one baking sheet.
Food Safety for Meat Filled Breads
Give yourself enough time to prep the fillings and allow them to cool completely.
To maintain the best food safety, meat should be fully cooked and fully cooled before placing it into the dough.
I never recommend using raw meat in sourdough recipes due to the long sitting time for fermentation. Using fully cooked and fully cooled meats or cured meats like hot dogs, bacon, or other varieties with proper handling is generally considered safe.
Temperature is key for safe food handling so always remember the following:
- Never combine warm ingredients with raw dough.
- Fully cook meat for stuffed breads until internal temperature reaches 160 degrees F. Then use techniques like spreading the cooked meat out in smaller containers or on a wide, shallow baking tray or casserole dish to allow it to cool down as quickly as possible. According the the USDA food safety website, you can place the containers of cooked meat in an ice bath or directly into the fridge to rapidly cool them down for refrigerator storage.
- Bake stuffed breads until they are fully baked. The interior of the bread should be 195 to 200 degrees F.
- Enjoy hot foods when they are hot. Let them cool completely to room temperature before storing in the refrigerator.
- Foods with meat or eggs should be reheated in an oven or microwave until the interior temperature reaches 165 degrees F and holds the temperature for 15 seconds.
- Cooked foods stored properly should be enjoyed (with proper reheating) within 5 days of preparation.
- For best food safety, enriched sourdough recipes can be placed in the fridge for a slow cold fermentation.
For more food safety info, learn more here: CDC Food Safety

Optional: Vegetable Prep for the Savory Filling
If you’d like to add some vegetables to your savory filling, here are some of my recommendations. Vegetables are optional so if you’d prefer just meat and cheese, skip this section.
Recommended vegetable amounts:
- 1/4 to 1/3 cup diced onion
- 1/4 to 1/3 cup diced bell pepper
- 1/4 to 1/3 cup chopped mushrooms (not ideal if you’re planning for leftovers since the consistency changes during reheating.
You can use only one vegetable or a combination.
Since these vegetables contain water, it is helpful to saute them before shaping them into the bread to avoid the dough becoming soggy from absorbing this moisture through prolonged contact.
To cook the vegetables, you can cook them with the ground meat or in a separate pan.
To cook them separately, saute them in a pan with 1 T. butter or olive oil until they are soft and fragrant. Set aside in a wide bowl to cool down completely. After 15 minutes of cooling in a separate container, cover the vegetables and place them in the refrigerator.
Or you can add them to the pot with the ground meat to cook along with the meat, season, and cool as directed in the next section.
It is possible to use raw vegetables, but to keep the dough from absorbing moisture from the raw vegetables they must be covered with cheese after placing on top of the ground meat to minimize contact with the dough.
Preparing the Savory Fillings
Before cooking the meat, if you’d like to use vegetables in your savory filling, dice those and saute separately in
Preheat a large pot over medium heat and place your ground meat into the warm pot. Use a cooking spatula to break apart the meat into a fine crumble as it cooks.
Cook the meat until it is fully cooked with no more pink. If there is more than 2-3 tablespoons of fat, place a fine mesh colander over a separate bowl and strain the meat to get some of the excess fat or oil out.
Add 1 T. of seasoning mix (Mexican seasoning, Italian seasoning, ranch seasoning, etc.) and 1/4-1/3 c. water to the meat. If your seasoning mix doesn’t include salt, add salt to taste. For 1 lb. of ground meat, usually 1/2-1 t. of salt is recommended.
Return the heat to medium. Bring the mixture to a high simmer and stir the meat until it is completely infused with the herbs and spices. Simmer until the water is nearly all evaporated.
Remove the meat from the heat. Separate the meat into a few smaller containers or bowls or onto 1 large rimmed baking sheet or casserole dish to cool. (See food safety notes in previous section)
Shred cheese and set aside.
Shaping Sourdough Meat Filled Braided Bread
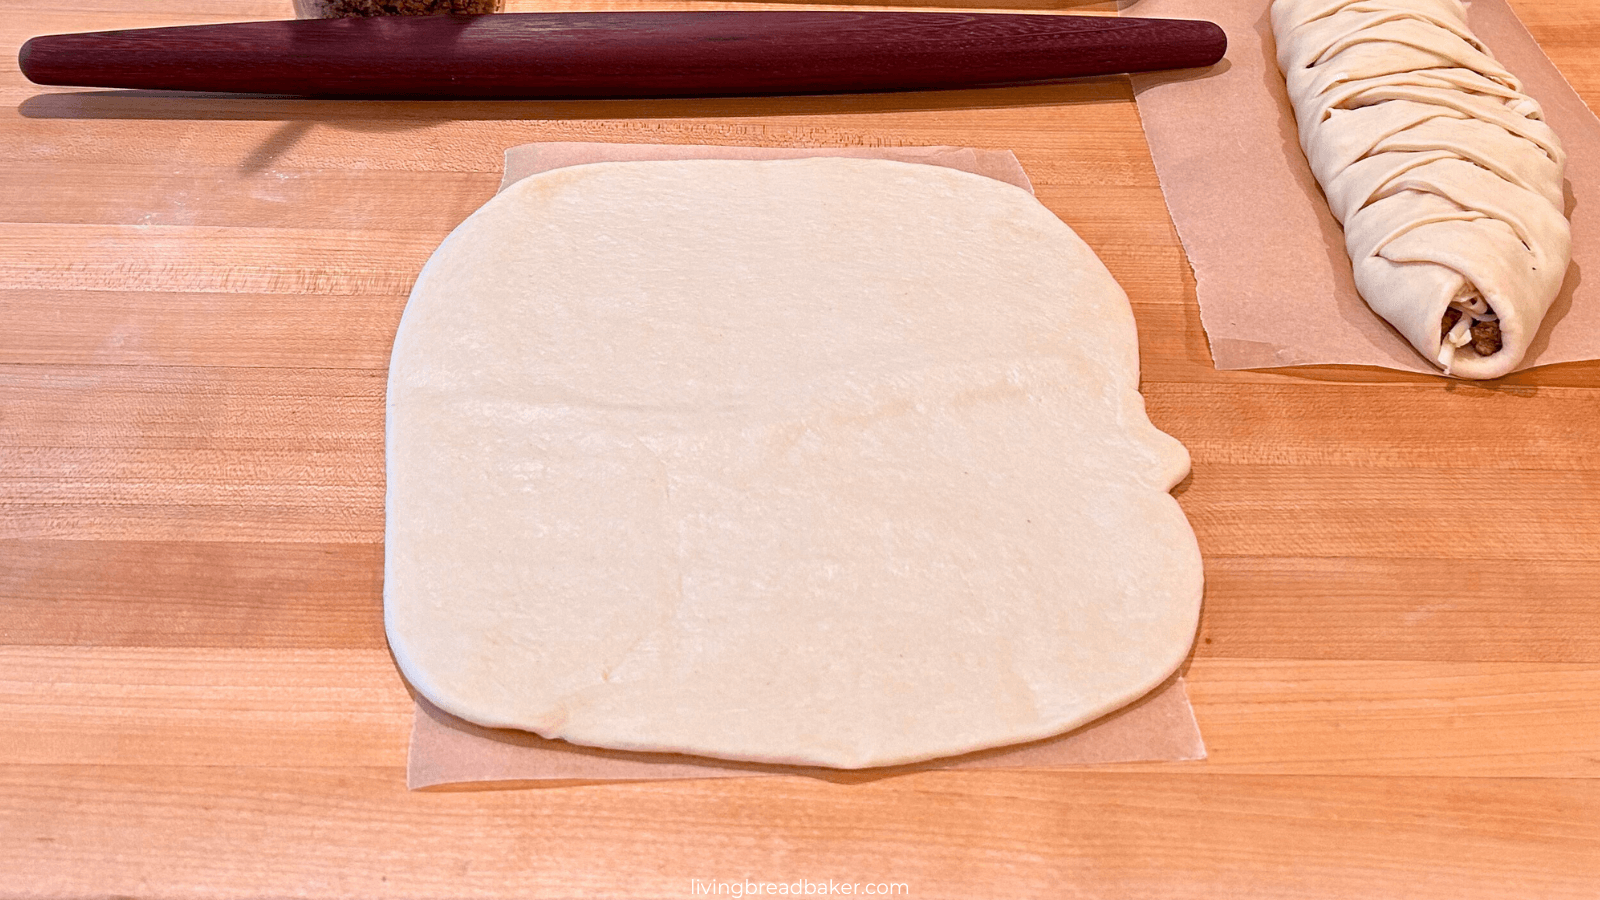
- Place the dough on a lightly floured surface. Divide the dough into two equal halves.
- Sprinkle a small amount of flour (I like using a flour dusting shaker for this) on top of the dough.*
- Use a rolling pin to roll out each half of dough into a rectangle that is 8 inches wide by 11-12 inches long. The 8×12 inch rectangle should have an even thickness of about 1/8 to 1/4 inch.
- Place each rectangle of dough on top of two separate sheets of parchment paper. One paper for each half of the dough.
Filling the Sourdough Meat Filled Braided Bread
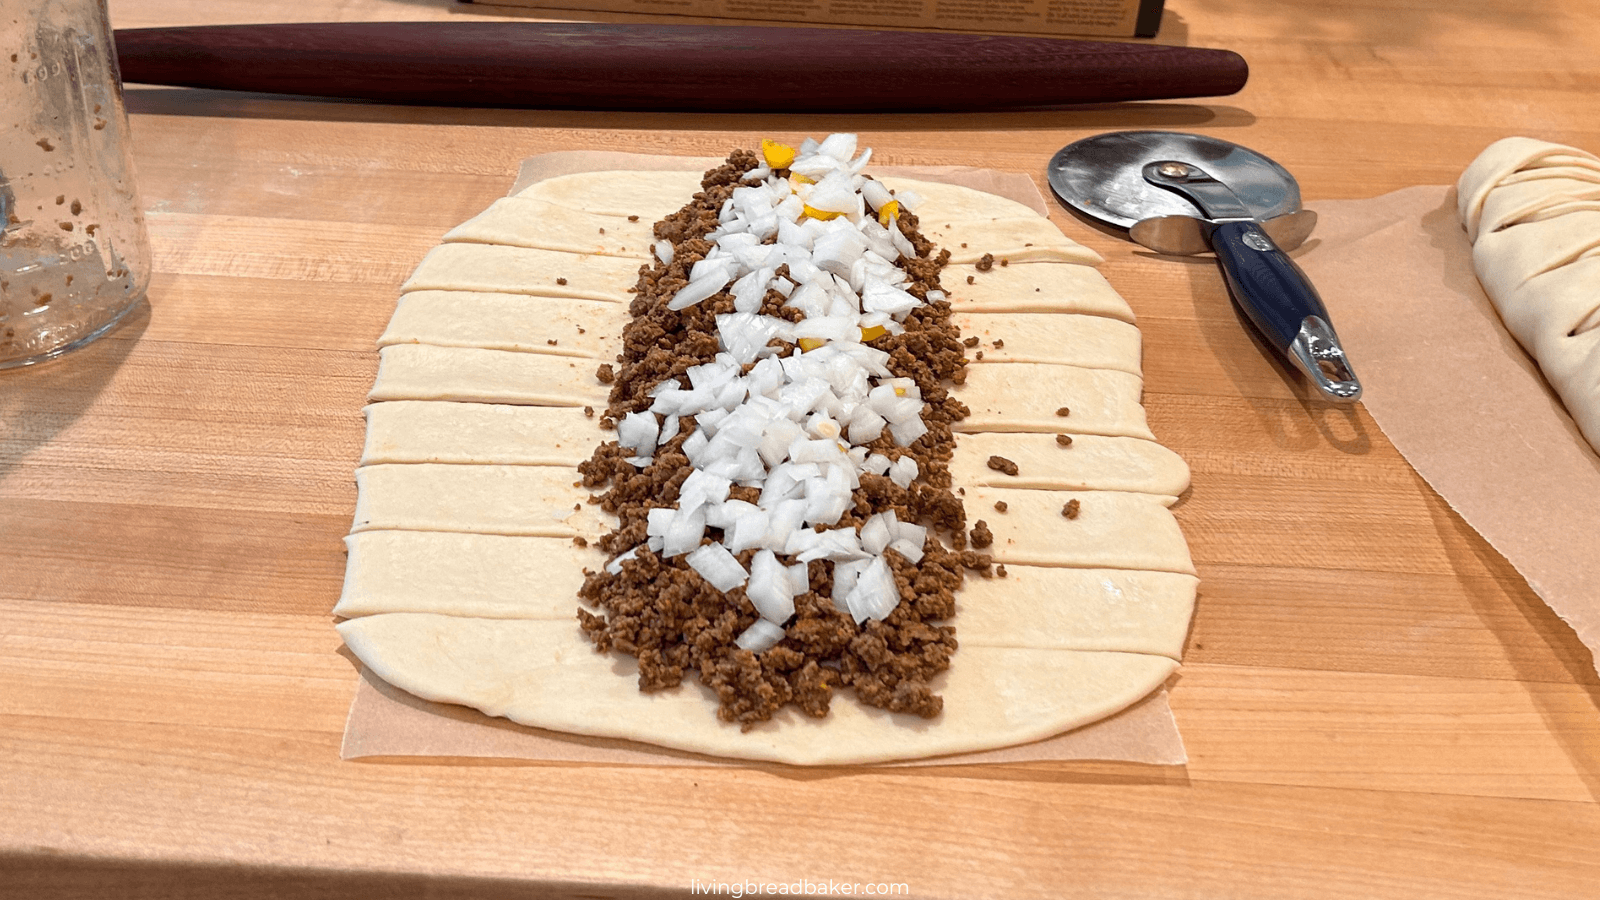
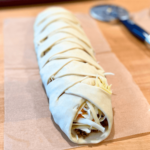
- Use the rolling pizza cutter to cut 1 1/8 to 1 1/4 inch wide slits on the left and right sides of the long edges of the dough 3 inches in but leave the center uncut (See photo for reference to see spacing. Although I filled the meat before cutting in my example, cutting first makes the process cleaner).
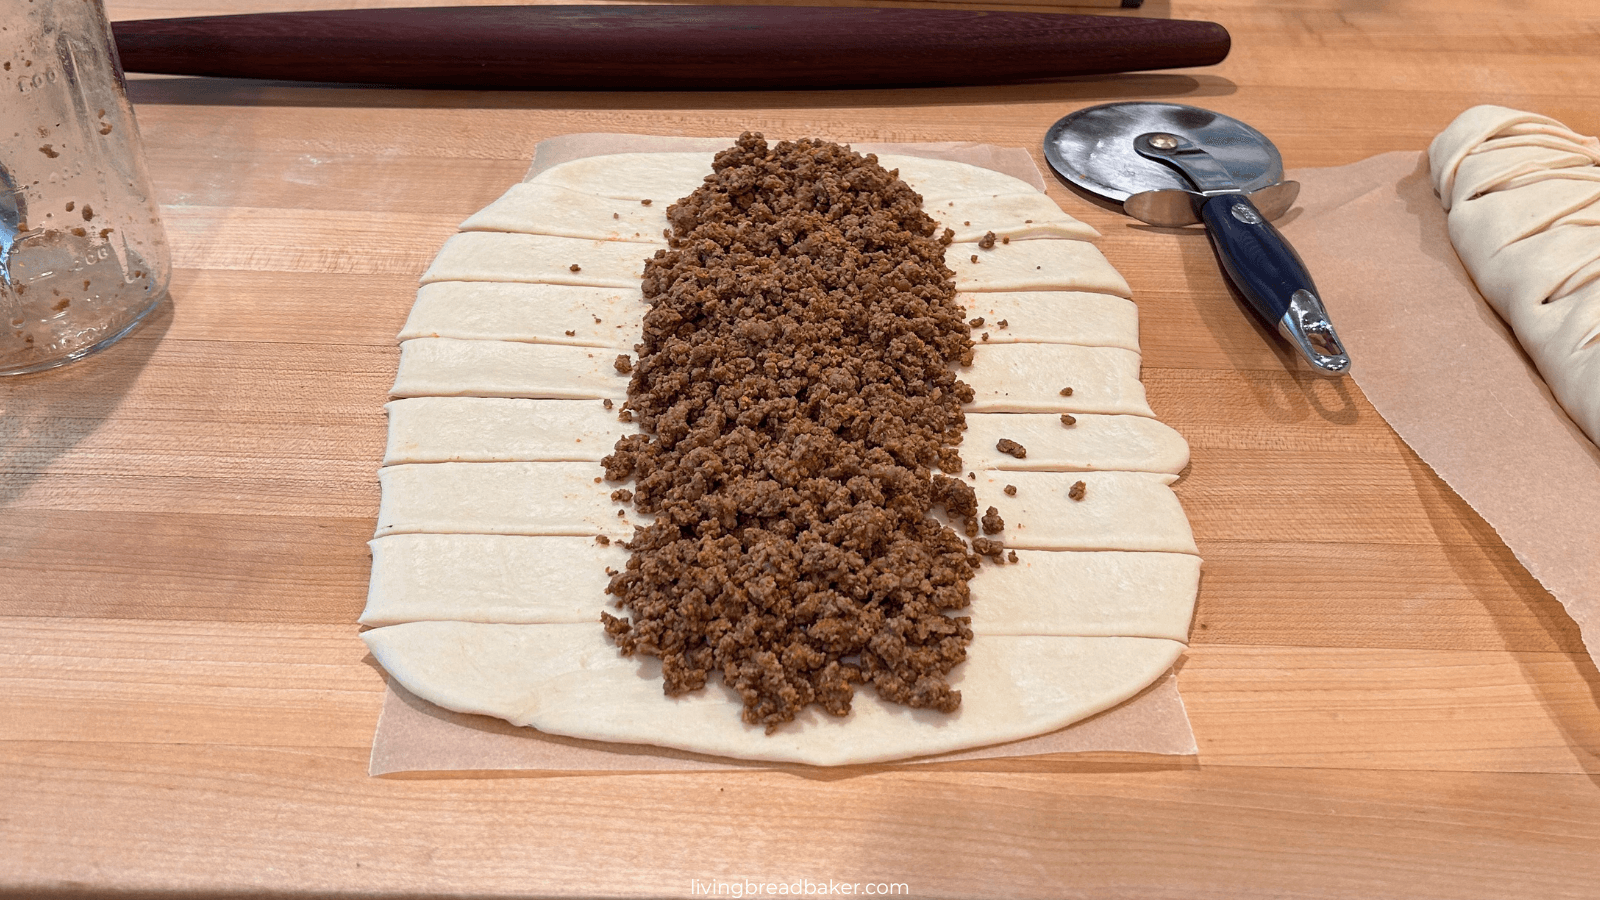
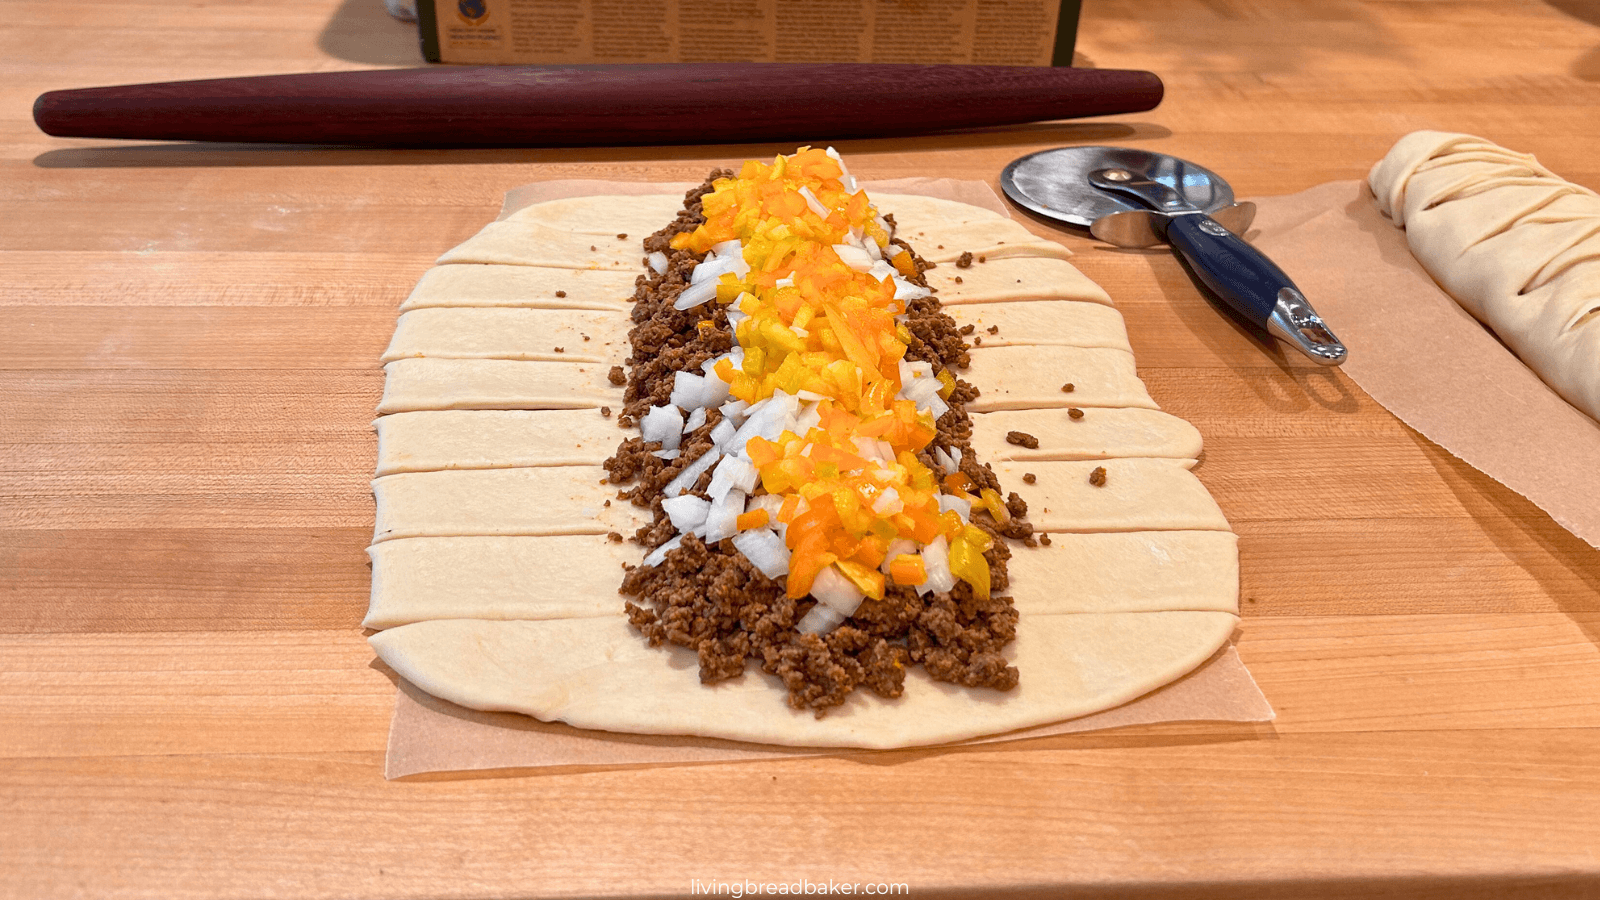
- Place half of the cooked (and cooled) ground meat evenly along the uncut middle of the dough. Use the back of a spoon to make sure its spread evenly. If you are adding vegetables, lay them evenly on top of the meat.
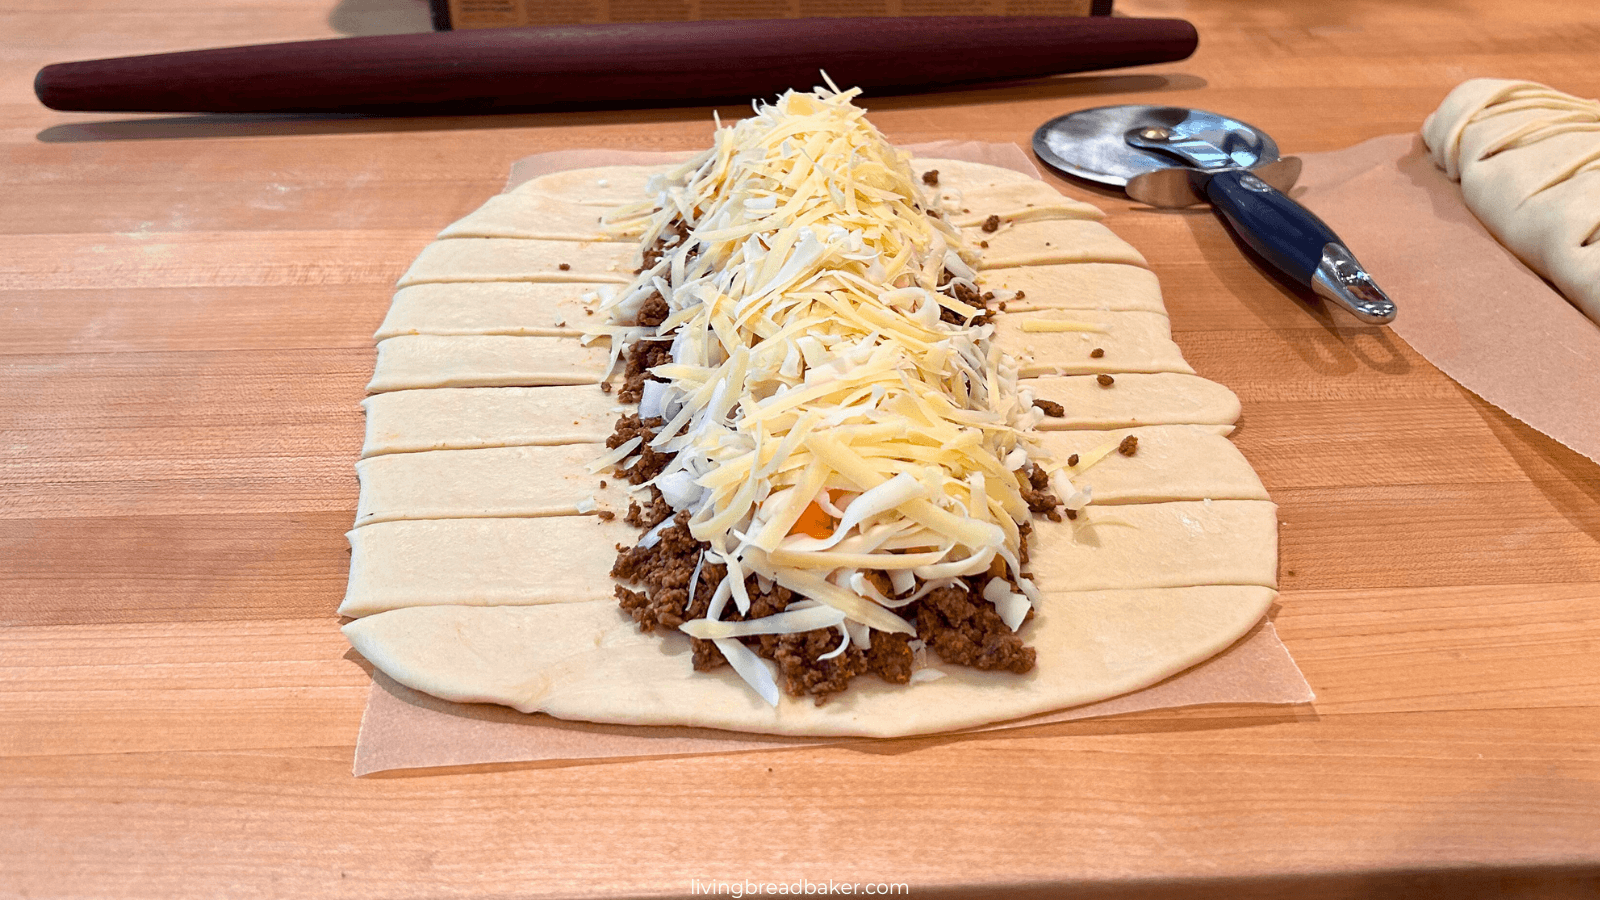
- Sprinkle 1/4 cup (half) of the shredded cheese evenly over the meat.
Braiding the Sourdough Meat Filled Braided Bread
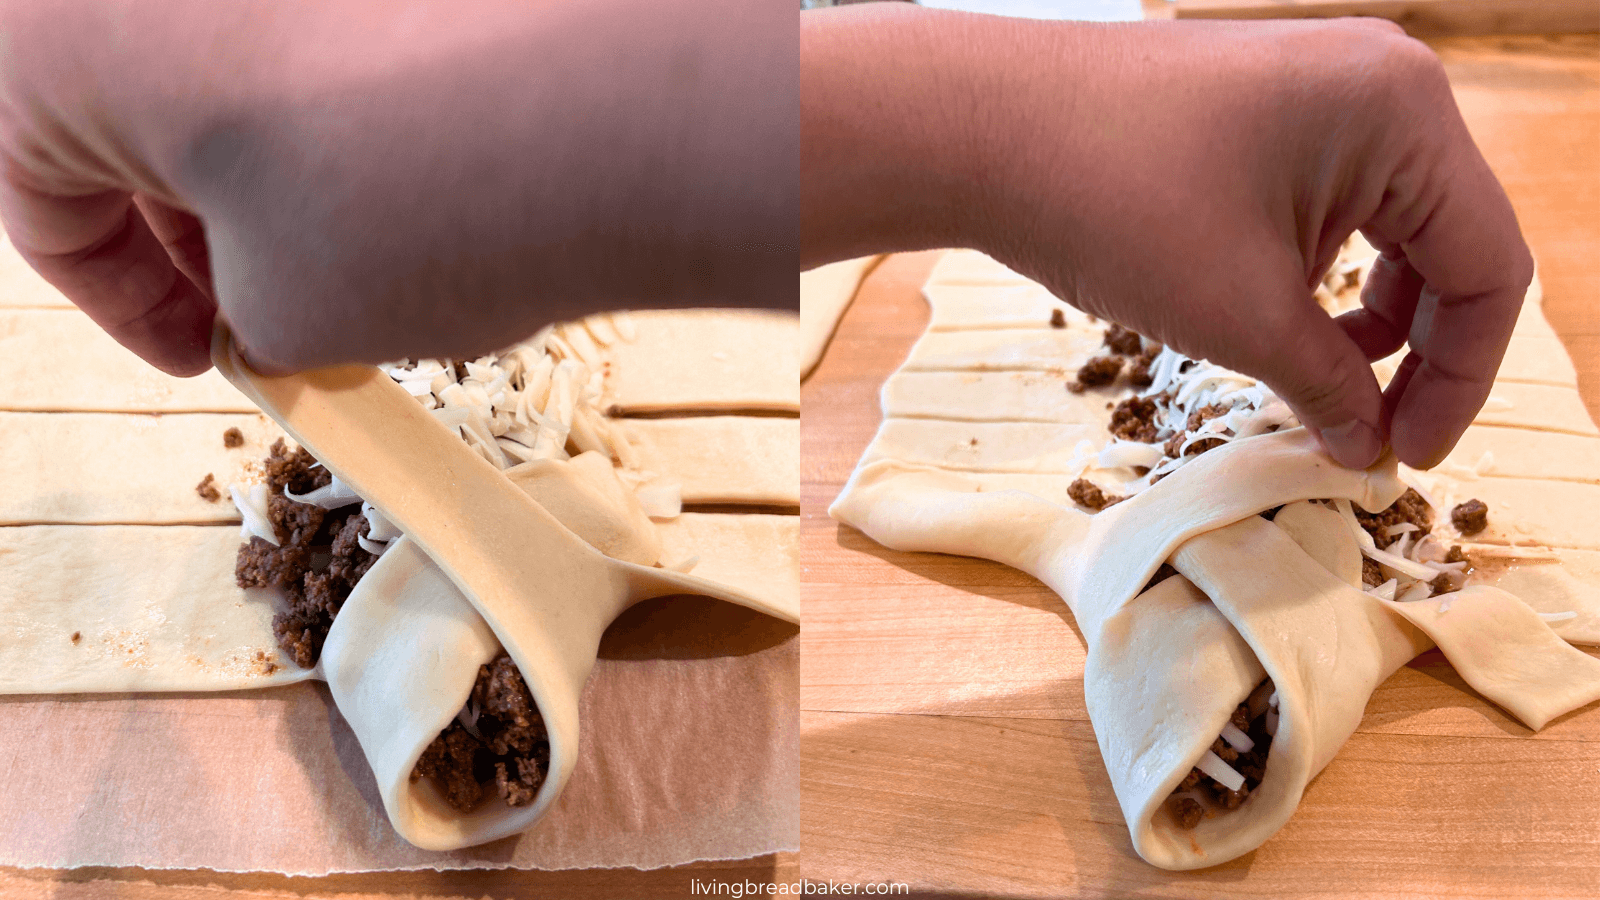
- Start at the bottom of the dough, take the bottom left cut slit or flap of dough and fold it up and over the dough at an angle (about 45 degrees). Take the one on the right side and fold it in the same way over the previous flap of dough. Note: Don’t tug or pull on the dough, just lay it over the filling. The pattern is key here for the best look, not stretching.

- Go to the next row and starting with the first side (left in this example), fold the flap of dough at the same angle over the dough. Fold the flap on the right side in the same way over the dough. Continue this pattern until the entire bread is braided.

- Once you have braided all the edge pieces over the savory filling, tuck the final ends of dough under the center at the top of the dough. Press and fold the bottom of the dough as well to seal in the filling.
- Slide the shaped dough onto a flat baking sheet to proof.
- Repeat steps 3-11 with the other half of the dough and the filling ingredients.
- Cover the breads with plastic wrap while they proof.
*After completing the bulk ferment, it should not be too sticky, if you have very sticky dough, assess whether it needs more fermentation time.
Proofing
Let the covered stuffed breads sit at room temperature for the proof or second rise for 1 to 2 hours.
During this dough rest, the dough should rise to create more volume and the dough should feel soft to the touch, enough for a finger to leave an indentation when poked.
After the breads have proofed, place the braided loaves in the fridge if you’re not baking them right away.
See this post about how to time plan your bake for the best results! How to Plan Your Holiday Sourdough Baking Schedule
Baking
Prepare the egg wash and brush over the bread before it goes in the oven. Make sure you get all the sides of the bread and between the strips of braided dough.
If you’d like to add poppyseeds or something similar you can sprinkle it over the egg washed bread. If you’d like to add shredded cheese, add that in the last 5 minutes of baking to avoid overbaking the cheese.
Bake 20 minutes. Then rotate breads and add shredded cheese if you’d like at this point in baking.
Increase temperature to 400 degrees F and bake 5-10 additional minutes until the outside of the bread is golden brown.
Use a meat thermometer to test the internal temperature of the bread at a thick part of the bread on the edge (avoid the meat in the center). The internal temperature should be 195-200 degrees F. 
Cooling
Enjoy hot with your favorite toppings and sides.
Storing
In the food safety section above, there are many important instructions for food safety.
To store this meat stuffed bread safely
Variations
Here is some inspiration for different ways you could fill this sourdough braided bread:
- Taco meat and cheese
- Breakfast sausage and cheese (this is a sourdough version, but I have a recipe of a stuffed breakfast braid made with commercial yeast in my book Celebrate with Bread Baking)
- Peeled, diced apples with spices and nuts
- Sauteed vegetables and cheese
- Shredded BBQ chicken and cheese
- Italian sausage, vegetables, and cheese with warm marinara sauce for dipping

Tips for Your Sourdough Stuffed Braid Bread
- Make sure all your fillings are cooled and do not have too much water content.
- This is a great recipe to prep ahead of time and bake the next day! Fill and shape your bread, cover with plastic wrap, and put in the fridge for up to 12 hours. Then take it out an hour before baking to temper and rise before baking.
- This recipe uses a 100% hydration starter. This style of starter is familiar to most sourdough bakers making it easier to attempt this recipe.
- *You may have noticed I used all-purpose flour in this recipe, not bread flour. All-purpose flour makes this bread softer and less chewy than bread flour.
- Dough that has perfectly fermented, should not be sticky after the bulk ferment. Only a very light amount of dusting flour should be needed during shaping.
Benefits of Sourdough in this recipe
Sourdough adds incredible flavor and texture to this classic appetizer, making it a treat for foodies.
The long fermentation process makes the dough more digestible, breaking down gluten proteins and reducing digestive irritation.
Unlike conventional recipes that rely on added sugar and fats for flavor, sourdough develops rich, complex flavors naturally over time.
Additionally, sourdough timelines are more forgiving, reducing the risk of overproofing.
Savor and Share
Share this easy savory treat recipe with a friend!
I love how perfect this is to prep ahead and bake the next morning or to transport if you are bringing a meal to a friend or have a potluck to go to.
This sourdough recipe from my master recipe helps give sourdough bakers an advantage in the kitchen by making sourdough baking feel easier!
After you try it, send me a note, leave a review comment, or tag me on facebook or instagram @livingbreadbaker 
More savory sourdough recipes
- Easy Sourdough Pizza Rolls Recipe
- Savory Sourdough Cheese Herb Babka Bread Recipe
- Jalapeño Cheddar Sourdough Bread Recipe (Cheesy Crust)
- Easy & Soft Savory Sourdough Cheese Twist Rolls
- Easy Sourdough Pizza Crust Recipe and Guide for Oven Baking
- No Lye, Easy Soft Sourdough Pretzels with Stiff Starter
- See this recipe and over 30 other easy sourdough recipes that are perfect for kid-friendly lunches and snacks
Just getting started with sourdough?
A competent guide transforms sourdough baking from overwhelming to uncomplicated and fun!
Get My Free Quick Start Sourdough Guide: Learn the key terms and concepts in sourdough baking, including the differences between active sourdough starter and sourdough discard, and how to care for your starter.
Get My Free Sourdough Starter Making Workbook: Follow the steps in my workbook to make your own sourdough starter from scratch in 7 days or less!
Start Baking Sourdough Confidently—Take the Intro to Sourdough Course for Just $27!
Time Planning Help for Sourdough Baking
The #1 need for sourdough bakers is help with time planning, so I created a resource for you.
Sourdough Time Planning Workbook: Perfect for new or experienced bakers, this workbook includes 8 templates ready to fill in and a baking journal. The templates cover 4 different ways to make classic sourdough country breads, 3 time planning worksheets for enriched sourdough bread depending on serving time target, and a blank template. The baking journal goes over baker’s percentages and how to take notes on your sourdough bakes.
Get a free sample of the workbook: Use this sourdough time planning worksheet sample to simplify your baking.
Get my free menu planning template: I use this template to plan my groceries, all our meals, and cooking and sourdough baking prep.
Living Bread Baker posts mentioned
When is sourdough bulk fermentation finished?
When is sourdough finished proofing?
Easy Sweet & Soft Sourdough Bread Master Recipe
Savory Sourdough Cheese Herb Babka Bread Recipe
Easy Sourdough Pizza Rolls Recipe (Appetizers or Meal)
Jalapeño Cheddar Sourdough Bread Recipe (Cheesy Crust)
Easy & Soft Savory Sourdough Cheese Twist Rolls
Easy Sourdough Pizza Crust Recipe and Guide for Oven Baking
No Lye, Easy Soft Sourdough Pretzels with Stiff Starter
Shop this post
Earlywood Designs French rolling pin
FREE Sourdough Quick Start Guide
Sourdough Time Planning Workbook & Baking Journal
My Intro. to Sourdough online course
This post contains affiliate links. Read my policy here.
Sourdough Meat Filled Braided Bread (easy dinner recipe)
Ingredients
Starter preparation
- 15-20 g 1 T. sourdough starter
- 60 grams 7 tablespoons all-purpose or bread flour
- 60 grams 1/4 cup water
Dough
- 100 g whole milk warmed (see step 2)
- 40 g water
- 30 g sugar
- 100 g active sourdough starter
- 375 g all purpose flour see tips*
- 7 g 1 t. salt
- 1 egg
- 45 g 3 T. unsalted butter, softened
Filling
- 1 lb. ground meat I prefer lean ground beef**
- 1 T. seasoning mix for taco bread, I use my Mexican Seasoning blendLINK
- 1/2 cup grated cheese Monterey Jack or Cheddar are typically my choice for taco bread
- optional: diced onions bell peppers, and/or mushrooms (see tips in notes below)***
Topping
- Egg for egg wash
- Optional: additional grated cheese poppyseeds, sesame seeds, or other topping
Instructions
Ingredient Preparation
- Once your sourdough starter is active, prepare the milk.
- Add more whole milk than the recipe calls for to allow for evaporation. Heat the milk over medium to medium-high heat until it is steaming and proteins begin to stick to the pot. Temperature will be 130 to 140 degrees F. Don't let it foam.
- Transfer 100g of your scalded milk to the bowl of a stand mixer, large bowl, or a separate glass carafe to cool down to 90-100 degrees F.
Making the Bread Dough
- Once your milk is cooled and in the bowl of a stand mixer or large mixing bowl, add the water, the sugar, 100g of the active starter, and flour mixture. Stir with a dough hook attachment about 4 times around the bowl or with a large spoon if you are mixing by hand for 1 to 2 minutes until ingredients are beginning to combine and it looks like a shaggy dough mixture. Add the egg* (*the master recipe also includes vanilla extract, but I leave it out for this savory recipe. It doesn't impact the texture of the final dough).
- Continue mixing the dough until it becomes completely combined and soft. Make sure to scrape your mixing bowl with a bench scraper at various points.
Kneading the Bread Dough
- Once all the ingredients except the softened unsalted butter are added, it is time to knead your dough into a smooth, soft ball.
- When using a stand mixer, use low to medium-low speed (I recommend the lowest 2-3 speeds) to knead your dough. It will take 5 to 8 minutes to get combined and soft until it pulls away cleanly from the sides of the bowl. Kneading by hand will take 8 to 12 minutes.
- Now, it is time to knead in the softened unsalted butter. Add it one tablespoon at a time with kneading in between each addition.
- Continue kneading until the butter is completely incorporated into your dough and it pulls away cleanly from the sides of the bowl or kneading surface and is a soft smooth ball.
Bulk Fermentation for Sourdough Stuffed Savory Bread
- Place the dough in an airtight container or cover a large bowl with plastic wrap. I recommend a 4-qt Cambro container for bulk fermentation.
- Let the dough rise at room temperature for 4 to 8 hours until it doubles. Ideally, find a warm place in your kitchen for the dough to rest.
Baking Sheet Prep
- Prepare one or two baking sheets by lining each baking sheet with parchment paper.
- For easier prep, I recommend using one piece of parchment paper for each braided bread. You can cut one in half to shape each bread individually on one and then place both onto one baking sheet.
Optional: Vegetable Prep for the Savory Filling
- If you'd like to add some vegetables to your savory filling, here are some of my recommendations. Vegetables are optional so if you'd prefer just meat and cheese, skip this section.
- Recommended vegetable amounts:
- 1/4 to 1/3 cup diced onion
- 1/4 to 1/3 cup diced bell pepper
- 1/4 to 1/3 cup chopped mushrooms (not ideal if you're planning for leftovers since the consistency changes during reheating.
- You can use only one vegetable or a combination.
- Since these vegetables contain water, it is helpful to saute them before shaping them into the bread to avoid the dough becoming soggy from absorbing this moisture through prolonged contact.
- To cook the vegetables, you can cook them with the ground meat or in a separate pan.
- To cook them separately, saute them in a pan with 1 T. butter or olive oil until they are soft and fragrant. Set aside in a wide bowl to cool down completely. After 15 minutes of cooling in a separate container, cover the vegetables and place them in the refrigerator.
- Or you can add them to the pot with the ground meat to cook along with the meat, season, and cool as directed in the next section.
- It is possible to use raw vegetables, but to keep the dough from absorbing moisture from the raw vegetables they must be covered with cheese after placing on top of the ground meat to minimize contact with the dough.
Preparing the Savory Fillings
- Before cooking the meat, if you'd like to use vegetables in your savory filling, dice those and saute separately in
- Preheat a large pot over medium heat and place your ground meat into the warm pot. Use a cooking spatula to break apart the meat into a fine crumble as it cooks.
- Cook the meat until it is fully cooked with no more pink. If there is more than 2-3 tablespoons of fat, place a fine mesh colander over a separate bowl and strain the meat to get some of the excess fat or oil out.
- Add 1 T. of seasoning mix (Mexican seasoning, Italian seasoning, ranch seasoning, etc.) and 1/4-1/3 c. water to the meat. If your seasoning mix doesn't include salt, add salt to taste. For 1 lb. of ground meat, usually 1/2-1 t. of salt is recommended.
- Return the heat to medium. Bring the mixture to a high simmer and stir the meat until it is completely infused with the herbs and spices. Simmer until the water is nearly all evaporated.
- Remove the meat from the heat. Separate the meat into a few smaller containers or bowls or onto 1 large rimmed baking sheet or casserole dish to cool. (See food safety notes in previous section)
- Shred cheese and set aside.
Shaping Sourdough Filled Braided Bread
- Place the dough on a lightly floured surface. Divide the dough into two equal halves.
- Sprinkle a small amount of flour (I like using a flour dusting shaker for this) on top of the dough.*
- Use a rolling pin to roll out each half of dough into a rectangle that is 8 inches wide by 11-12 inches long. The 8x12 inch rectangle should have an even thickness of about 1/8 to 1/4 inch.
- Place each rectangle of dough on top of two separate sheets of parchment paper. One paper for each half of the dough.
- Use the rolling pizza cutter to cut 1 1/8 to 1 1/4 inch wide slits on the left and right sides of the long edges of the dough 3 inches in but leave the center uncut (see photo for reference).
- Place half of the cooked (and cooled) ground meat evenly along the uncut middle of the dough. Use the back of a spoon to make sure its spread evenly. If you are adding vegetables, lay them evenly on top of the meat.
- Sprinkle 1/4 cup (half) of the shredded cheese evenly over the meat.
- Start at the bottom of the dough, take the bottom left cut slit or flap of dough and fold it up and over the dough at an angle (about 45 degrees). Take the one on the right side and fold it in the same way over the previous flap of dough. Note: Don't tug or pull on the dough, just lay it over the filling. The pattern is key here for the best look, not stretching.
- Go to the next row and starting with the first side (left in this example), fold the flap of dough at the same angle over the dough. Fold the flap on the right side in the same way over the dough. Continue this pattern until the entire bread is braided.
- Once you have braided all the edge pieces over the savory filling, tuck the final ends of dough under the center at the top of the dough. Press and fold the bottom of the dough as well to seal in the filling.
- Slide the shaped dough onto a flat baking sheet to proof.
- Repeat steps 3-11 with the other half of the dough and the filling ingredients.
- Cover the breads with plastic wrap while they proof.
Proofing
- Let the covered stuffed breads sit at room temperature for the proof or second rise for 1 to 2 hours.
- During this dough rest, the dough should rise to create more volume and the dough should feel soft to the touch, enough for a finger to leave an indentation when poked. After the breads have proofed, place the braided loaves in the fridge if you’re not baking them right away
Baking
- Preheat oven to 375 degrees F.
- Prepare the egg wash and brush over the bread before it goes in the oven. Make sure you get all the sides of the bread and between the strips of braided dough.
- If you'd like to add poppyseeds or something similar you can sprinkle it over the egg washed bread. If you'd like to add shredded cheese, add that in the last 5 minutes of baking to avoid overbaking the cheese.
- Bake 20 minutes. Then rotate breads and add shredded cheese if you'd like at this point in baking.
- Increase temperature to 400 degrees F and bake 5-10 additional minutes until the outside of the bread is golden brown.
- Use a meat thermometer to test the internal temperature of the bread at a thick part of the bread on the edge (avoid the meat in the center). The internal temperature should be 195-200 degrees F.
Cooling
- Cool 15 to 30 minutes before slicing and enjoying. Enjoy hot with your favorite toppings and sides.
Notes
Ingredient notes
*All-purpose flour creates a soft dough for this recipe. Typically I use bread flour, but the all-purpose creates a better texture in this recipe. Bread flour works fine too. **Ground meat must be cooked and COOLED before assembling your bread. ***For best results, saute the vegetables and completely cool them before adding to the bread. However, I have added raw in a pinch but placed them between the layer of meat and shredded cheese to try to limit any direct contact with the dough to keep the vegetables from sogging the dough while its proofing.Food Safety for Meat Filled Breads
Give yourself enough time to prep the fillings and allow them to cool completely. To maintain the best food safety, meat should be fully cooked and fully cooled before placing it into the dough. I never recommend using raw meat in sourdough recipes due to the long sitting time for fermentation. Using fully cooked and fully cooled meats or cured meats like hot dogs, bacon, or other varieties with proper handling is generally considered safe. Temperature is key for safe food handling so always remember the following: Never combine warm ingredients with raw dough.Fully cook meat for stuffed breads until internal temperature reaches 160 degrees F. Then use techniques like spreading the cooked meat out in smaller containers or on a wide, shallow baking tray or casserole dish to allow it to cool down as quickly as possible. According the the USDA food safety website, you can place the containers of cooked meat in an ice bath or directly into the fridge to rapidly cool them down for refrigerator storage.
Bake stuffed breads until they are fully baked. The interior of the bread should be 195 to 200 degrees F.
Enjoy hot foods when they are hot. Let them cool completely to room temperature before storing in the refrigerator.
Foods with meat or eggs should be reheated in an oven or microwave until the interior temperature reaches 165 degrees F and holds the temperature for 15 seconds.
Cooked foods stored properly should be enjoyed (with proper reheating) within 5 days of preparation.
For best food safety, enriched sourdough recipes can be placed in the fridge for a slow cold fermentation.
For more food safety info, learn more here: CDC Food Safety
Optional: Vegetable Prep for the Savory Filling
If you'd like to add some vegetables to your savory filling, here are some of my recommendations. Vegetables are optional so if you'd prefer just meat and cheese, skip this section. Recommended vegetable amounts: 1/4 to 1/3 cup diced onion1/4 to 1/3 cup diced bell pepper
1/4 to 1/3 cup chopped mushrooms (not ideal if you're planning for leftovers since the consistency changes during reheating.
You can use only one vegetable or a combination. Since these vegetables contain water, it is helpful to saute them before shaping them into the bread to avoid the dough becoming soggy from absorbing this moisture through prolonged contact. To cook the vegetables, you can cook them with the ground meat or in a separate pan. To cook them separately, saute them in a pan with 1 T. butter or olive oil until they are soft and fragrant. Set aside in a wide bowl to cool down completely. After 15 minutes of cooling in a separate container, cover the vegetables and place them in the refrigerator. Or you can add them to the pot with the ground meat to cook along with the meat, season, and cool as directed in the next section. It is possible to use raw vegetables, but to keep the dough from absorbing moisture from the raw vegetables they must be covered with cheese after placing on top of the ground meat to minimize contact with the dough.


Saving this! My family is going to love it!
Enjoy! It’s received shouts of joy every time its served here! 🙂
Delicious and easy to make with a sensational appearance
I’m so glad to hear you enjoyed it!