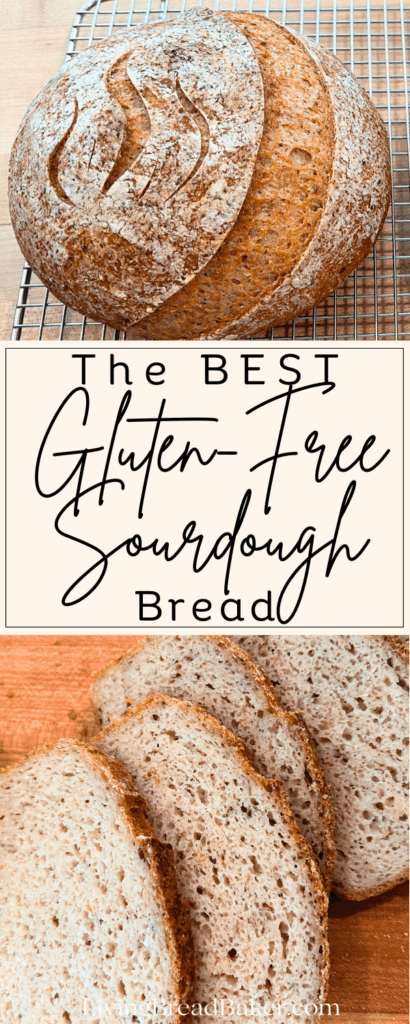
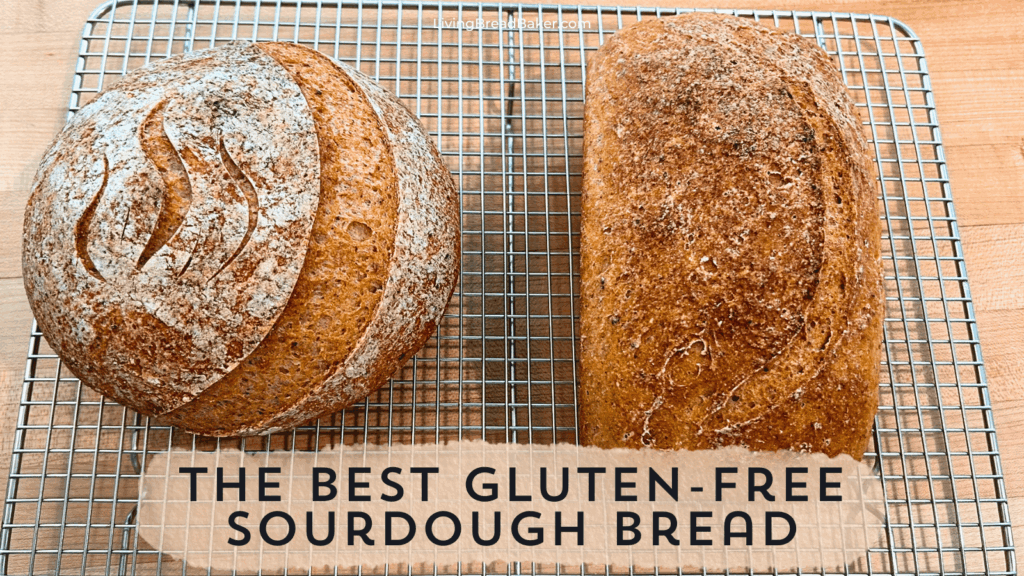
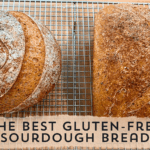
The Best Gluten-Free Sourdough Bread (Dairy-Free, Vegan)
Every recipe online claims to be “the best”, but this gluten-free sourdough bread is truly the best I’ve tried and even beat the pants off the flavor and texture of a $20 gluten-free sourdough bread from a micro bakery.
Our family has enjoyed some of the best sourdough bread as I’ve developed and refined my sourdough baking with traditional wheat-based sourdough through my cookbooks and sourdough classes I’ve taught. So they are a very picky crew!
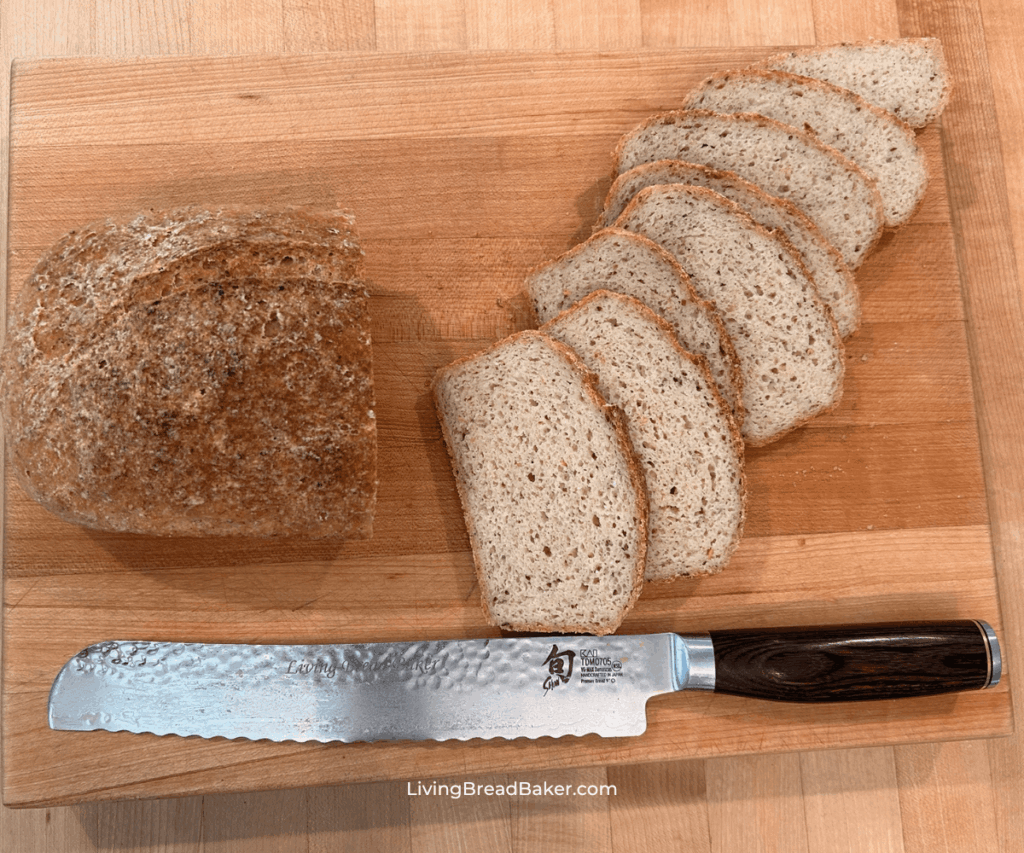
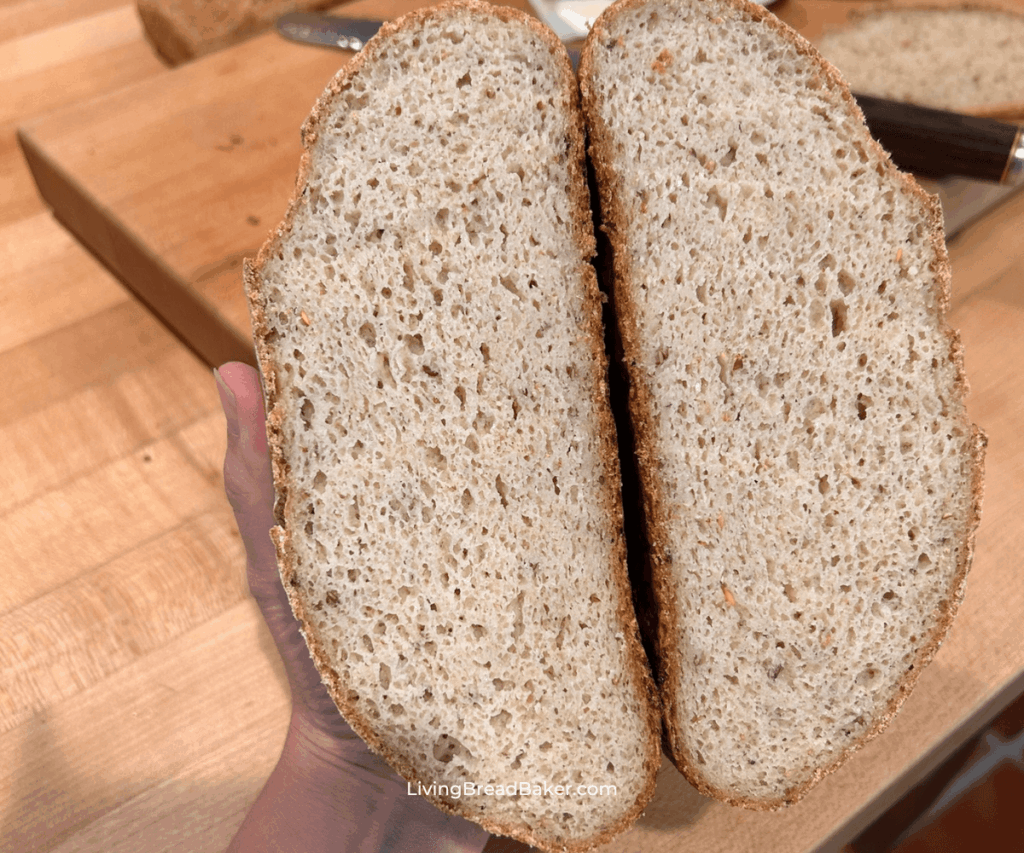
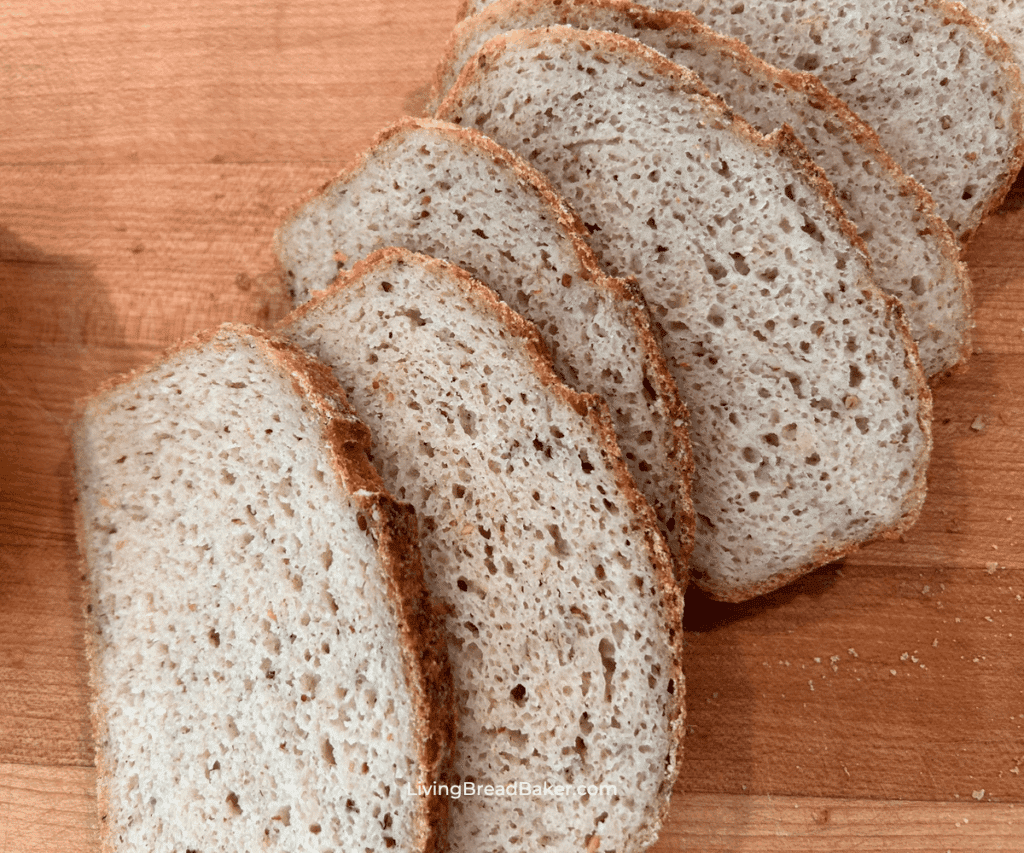
But this gluten-free sourdough bread got their stamp of approval! It has incredible flavor, a perfect rustic crust that’s not too thick, and a soft crumb that is perfect for sandwiches, toast, or just eating with a bit of olive oil or butter.
Why You’ll Love This Gluten-Free Sourdough Bread
To trust someone’s opinion of “the best”, it’s helpful to know what criteria they are using to judge.
That’s why as a traditional (wheat) sourdough enthusiast and sourdough teacher, I have the experience to recommend this recipe to you!
This recipe make two loaves which is great for big families or prepping gluten-free bread ahead of time
Plus this bread is made without dairy, eggs, oats, or gums like xanthan gum or guar gum, making it a great option for even most specialized or allergy-friendly diets.
Ingredients for the Best Gluten-Free Sourdough Bread
Here are the ingredients you’ll need to make this gluten-free sourdough bread (see all American measurements in recipe card):
- Preferment
- 150g gluten-free starter (about ¾ cup)280g water
- 260g white rice flour
- Dough
- All the preferment
- 640g water
- 40g psyllium husk
- 32g flaxseed, ground (4 T., golden flaxseed preferred but regular works fine)
- 40g Extra Virgin Olive Oil
- 15g sugar (1 T., honey is okay too)
- 20g sea salt (1 T.)
- ½ t. ginger powder
- ½ t. apple cider vinegar
- 150g brown rice flour
- 150g tapioca flour/starch
- 100g millet flour
- 100g sorghum flour
- 40g potato starch
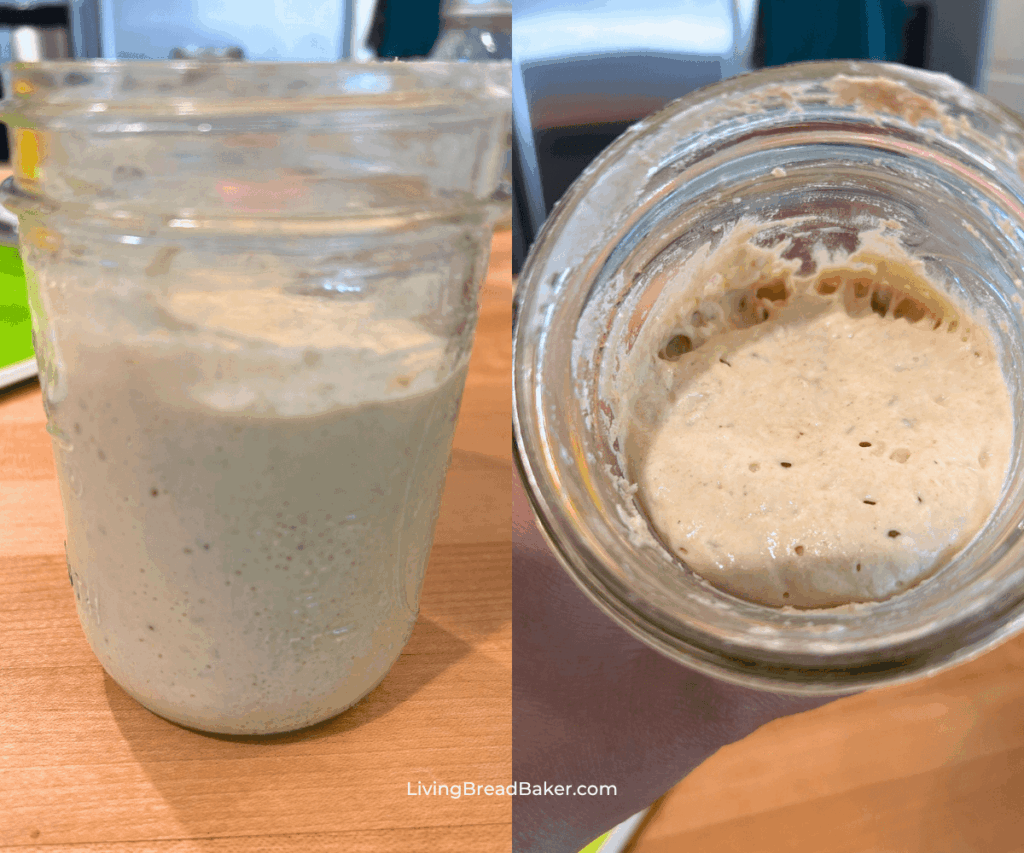
About the Gluten-Free Sourdough Starter
If you’re new to gluten-free sourdough or want to make a gluten-free starter, make sure to read this post that is a thorough introduction and has a step-by-step guide to make a gluten-free starter.
Gluten-free sourdough starters are similar to traditional sourdough starters which need regular care and maintenance through discarding or using the bulk and then feeding a small remainder.
I feed my gluten-free starter with water and a blend of 50% millet flour and 50% hulled buckwheat flour.
It is important for the starter to be active for use in the preferment to give the bread the best rise.
Fermentation Differences in Gluten-Free Sourdough
Fermentation is much faster than traditional sourdough so the starter becomes active in only 3-8 hours, depending on how warm or cool the environment is.
A gluten-free sourdough starter shows that it is active by doubling in volume or size, it has bubbles on the surface and side of the jar, and it should have a pleasant ripe fruit smell.
This faster fermentation also applies to the preferment and the dough fermentation so be sure to make note of the timing in the recipe. From refreshing your starter to bread out of the oven, the process takes 24 hours.
Tools for Gluten-Free Sourdough Bread
- Extra Large mixing bowl
- Spoon
- Dough scraper
- Kitchen scale
- If you have the budget for it, a large capacity mixer can be a great investment to shorten your prep time.
- Rounded plastic dough scraper
- 2 Bannetons or Proofing Bowls/Baskets, 2 sandwich loaf pans, or 1 of each
- Plastic wrap or shower caps
- Fridge for cold proofing
- Bread Lame or bread knife for scoring the dough before baking
- Dutch Oven or see my post on baking with manual steam for baking sandwich loaves
- Parchment Paper
- Silicone Oven Mitts
- Cooling Rack
- Bread Knife for safe and efficient slicing. My favorites are Wusthof bread knife and the Shun bread knife
See the full list of my recommended essentials here: Amazon idea list of Sourdough Essentials (see affiliate disclosure)
Have a limited budget? This post outlines the absolute essentials so you don’t have to break the bank to get started plus some hacks to get along without all the “right tools”: Beginners’ Guide to Sourdough Bread Baking Tools on a Budget
Step-by-Step Instructions for Gluten-Free Sourdough Bread
1. Preparing the Starter and Preferment
You will need to get your starter active by refreshing so it is active to mix into the preferment ingredients.
Once it is active, mix 150g of your starter with the water and white rice flour in a large capacity mixing bowl. Make sure it is fully combined then cover and leave at room temperature to rise for 3-8 hours until it is puffy and has bubbles. It will become almost double in volume.
Make sure to care for your starter before you finish this step!
2. Make the Dough
Once the preferment is active, add the water and psyllium husk to the preferment and mix together to bread up the preferment and allow the psyllium husk to gel for 2-4 minutes.
Gather the rest of your ingredients.
In a separate bowl, measure out your dry ingredients: brown rice flour, tapioca starch, millet flour, sorghum flour, and potato starch. Mix well until totally combined then set aside.
To the wet starter/psyllium mixture, add the olive oil, ground flaxseed, sugar, salt, ginger, and apple cider vinegar. Mix well.
Then slowly add the dry flour mix to the wet and stir until the ingredients are completely blended and have formed a thick bread dough.
3. Divide the Dough
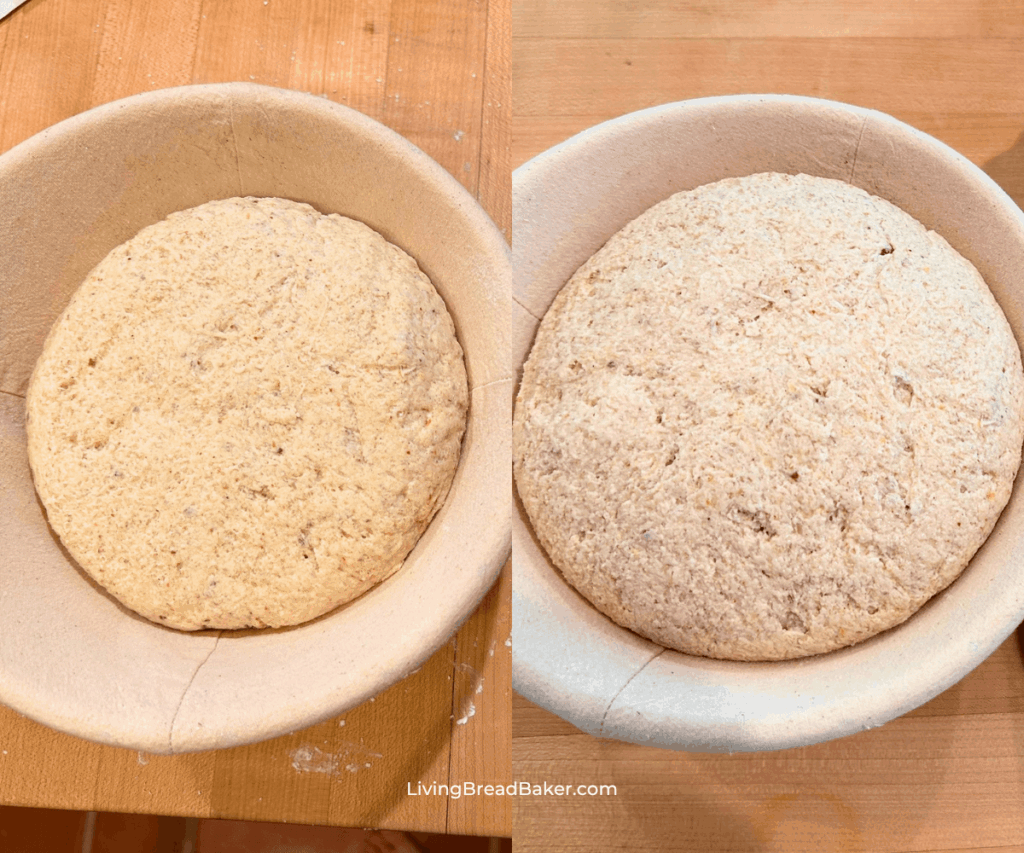
Divide the dough into two portions that have equal weights. Use an empty bowl. Each portion will weigh about 1010 grams.
4a. Shaping the Dough: Boule or Round Country Loaf Method
For a round loaf, lightly flour the banneton(s) or proofing bowl(s) and the work surface with white rice flour or tapioca starch then place a portion of dough on the flour. Pat the dough to flatten slightly to a 6 inch by 10 inch oval then fold the longer sides in to the middle so that the overlap and stick together. Then from the far end, roll the dough toward yourself to seal the seam you made into the middle of the dough. Use a dough scraper or bench knife to tighten the dough into a ball.
*Note the ball of dough will not be as perfectly smooth as a ball of gluten-based sourdough. It will look slightly rough and shouldn’t be overworked because it will become more sticky and messy. If your dough is getting too sticky, add more tapioca starch to your hands and work surface.
Once it is in a tightened ball, quickly slide the scraper underneath, then pick the ball of dough up and flip upside down into the floured proofing bowl.
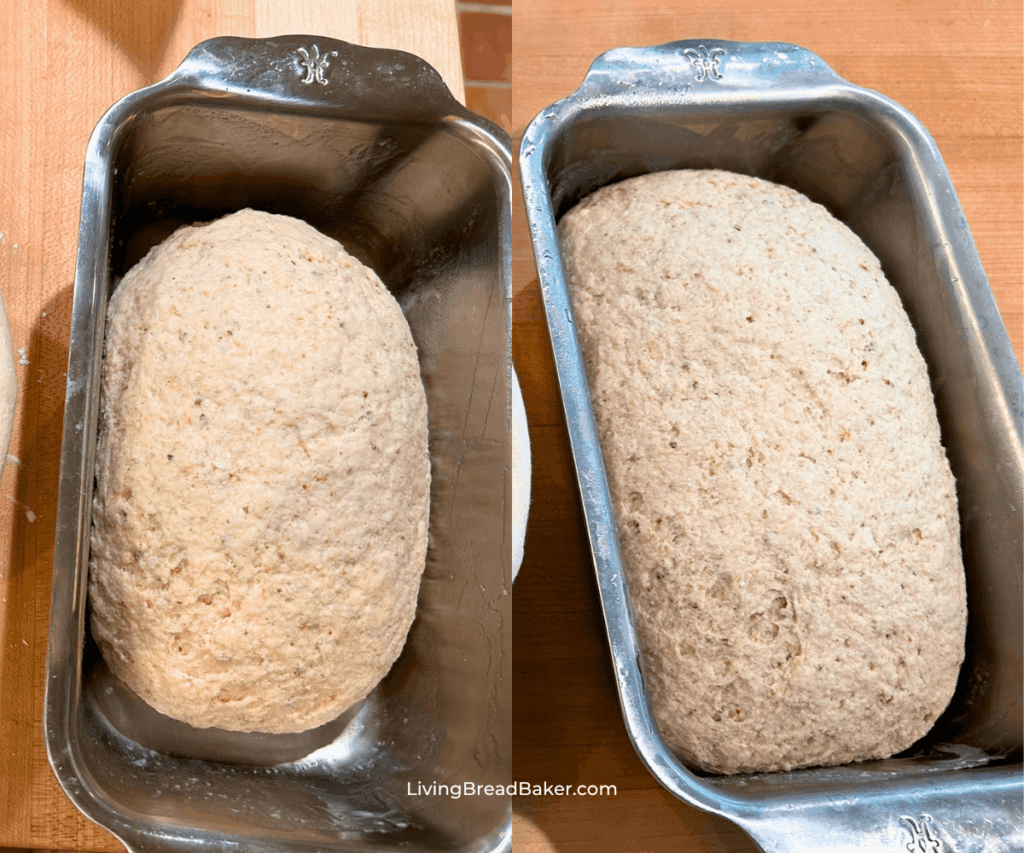
4b. Shaping the Dough: Sandwich Loaf Method
Generously grease your sandwich pan(s) with coconut oil or other oil or use a parchment paper liner (see the tutorial in this post to make a parchment liner).
Flour the work surface with white rice flour or tapioca starch then place a portion of dough on the flour. Pat the dough to flatten slightly to a 8 inch by 10 inch oval then fold the longer sides in to the middle so that the overlap and stick together. Then from the far end, roll the dough toward yourself to seal the seam you made into the middle of the dough. Use a dough scraper or bench knife to tighten the dough into a rounded oval shape. (see *note above)
Quickly slide the scraper underneath and lift the sandwich shaped dough into the prepared loaf pan.
5. Proofing (Two Steps)
Cover both bread doughs with plastic wrap or a plastic shower cap.
Leave at room temperature to rise for 1-2 hours (1 hour in warm weather, 2 hours in cold weather).
Then, transfer the doughs to the fridge to do a long cold proof for 4 hours to overnight (up to 12 hours).
The dough will rise to almost double in volume.
6. Preheat the Oven
If you are baking boules in a Dutch oven, preheat the Dutch oven with the oven. Preheat oven to 500 degrees F.
If you are baking a sandwich loaf and are using the manual steam method then preheat a pan filled with 1-2 inches of water in the oven. Preheat oven to 500 degrees F.
7a. Bake the Bread: Boule/Country Bread Method
Before baking, you’ll need to score your bread by using a bread lame or bread knife to cut a slash for the steam to escape.
For a boule or round loaf, place a large piece of parchment paper over the proofing bowl and by tightly holding the edges, flip the bowl over so that the dough is now right side up on the parchment. Cut a slit that is about ¼ inch deep in the center along the length of the top of the dough or you can cut an X shape on top.
Carefully take the hot Dutch oven out of the oven, oven and place the scored round ball of dough into the center of the Dutch oven by lifting it by the edges of the parchment. Firmly close the Dutch oven to seal the dough inside.
Repeat with the other boule if you are baking two boules.
Place the Dutch oven(s) back into the hot oven. Close the door and reduce the oven temperature to 450 degrees F for 35 minutes. After that time, very carefully remove the bread from the Dutch oven and place directly on the oven rack to bake for 15-20 minutes longer at the same temperature.
7b. Bake the Bread: Sandwich Loaf Method
For the sandwich loaf, just cut a slit that is about ¼ inch deep in the center along the length of the top of the dough.
Repeat with the other sandwich loaf if you are baking two sandwich loaves.
Place the scored bread(s) into the hot steamy oven. Close the oven to seal in the steam. An option to add extra steam is to crack the oven door and quickly spray the walls of the oven with a water spray bottle four to six times then close the door to seal in steam.
Reduce heat to 450 degrees F for 35 minutes. After that time, remove steam tray and continue baking at the same temperature for 15 to 18 more minutes.
8. Cool the Bread
Place the boules on a cooling rack to cool. If you baked sandwich loaves, carefully remove from the loaf pan to cool on the cooling rack.*
Cool the bread for at least 3 hours to let the crumb fully set to avoid a gummy loaf.
Storing Your Gluten-Free Sourdough Bread
This bread keeps well in a bread box at room temperature for up to 3 days. I prefer to keep it uncut and only cut the slices needed for that meal for optimal freshness.
If you need your bread for longer than that or you just aren’t eating it as quickly, you can slice the loaves and freeze them to toast and defrost as needed. See this post for guidance on freezing bread: How to Freeze Sourdough Bread, Scones, & More (Easy & Fast)

FAQs for Gluten-Free Sourdough Bread
- Can I reduce the recipe?
- Yes, to make just one loaf, divide the measurements in half. The rest of the recipe can be followed as written.
- Can I use different flours in the recipe?
- You can experiment, but I have not tested different flours. The only one I have tested was using tapioca starch in place of potato starch (for people sensitive to nightshades) which was successful. I would suggest trying only changing one at a time. Buckwheat is fairly comparable to brown rice flour or sorghum, but experiment at your own risk.
- Can I substitute the psyllium husk?
- No, psyllium husk is the essential binder that makes this dough stretchy and cohesive.
More Gluten-Free Posts
- Best Taco Seasoning Recipe (Homemade Mexican Seasoning)
- How to Switch to Gluten-Free Sourdough (What’s Different + What to Expect)
Make a Gluten-Free Starter
Need help getting started with gluten-free sourdough?
Get my steps to make a starter from scratch and learn all about gluten-free sourdough from my resources in this post: How to Switch to Gluten-Free Sourdough (What’s Different + What to Expect)
Living Bread Baker posts mentioned
How to Switch to Gluten-Free Sourdough (What’s Different + What to Expect)
Beginners’ Guide to Sourdough Bread Baking Tools on a Budget
Beginner’s Guide to the Sourdough Bread Baking Process
How to Bake Sourdough without a Dutch oven: Manual Steam Method
Why Is My Sourdough Bread Gummy? 7 Causes and How to Fix Them
How to Freeze Sourdough Bread, Scones, & More (Easy & Fast)
Best Taco Seasoning Recipe (Homemade Mexican Seasoning)
Shop this post
Bannetons or Proofing Bowls/Basket
The Best Gluten-Free Sourdough Bread (dairy-free, vegan)
Ingredients
Preferment
- 150g gluten-free starter about ¾ cup
- 280g water 1 cups + 3 T.
- 260g white rice flour 1 cups + ½ cup + 3 T.
Dough
- All the preferment
- 640g water 2 ½ cups + 3 T.
- 40g psyllium husk
- 32g flaxseed ground (4 T., golden flaxseed preferred but regular works fine)
- 40g Extra Virgin Olive Oil 3 T.
- 15g sugar 1 T., honey is okay too
- 20g sea salt 1 T.
- ½ t. ginger powder
- ½ t. apple cider vinegar
- 150g brown rice flour ¾ cup + 3 tbsp
- 150g tapioca flour/starch 1 ¼ cups
- 100g millet flour ½ cup + 2 T.
- 100g sorghum flour ½ cup + 2 T.
- 40g potato starch ¼ cup + 1 T.
Instructions
Preparing the Starter and Preferment
- You will need to get your starter active by refreshing so it is active to mix into the preferment ingredients.
- Once it is active, mix 150g of your starter with the water and white rice flour in a large capacity mixing bowl. Make sure it is fully combined then cover and leave at room temperature to rise for 3-8 hours until it is puffy and has bubbles. It will become almost double in volume.
- Make sure to care for your starter before you finish this step!
Make the Dough
- Once the preferment is active, add the water and psyllium husk to the preferment and mix together to bread up the preferment and allow the psyllium husk to gel for 2-4 minutes.
- Gather the rest of your ingredients.
- In a separate bowl, measure out your dry ingredients: brown rice flour, tapioca starch, millet flour, sorghum flour, and potato starch. Mix well until totally combined then set aside.
- To the wet starter/psyllium mixture, add the olive oil, ground flaxseed, sugar, salt, ginger, and apple cider vinegar. Mix well.
- Then slowly add the dry flour mix to the wet and stir until the ingredients are completely blended and have formed a thick bread dough.
Divide the Dough
- Divide the dough into two portions that have equal weights. Use an empty bowl. Each portion will weigh about 1010 grams.
Shaping the Dough: Boule or Round Country Loaf Method
- For a round loaf, lightly flour the banneton(s) or proofing bowl(s) and the work surface with white rice flour or tapioca starch then place a portion of dough on the flour. Pat the dough to flatten slightly to a 6 inch by 10 inch oval then fold the longer sides in to the middle so that the overlap and stick together. Then from the far end, roll the dough toward yourself to seal the seam you made into the middle of the dough. Use a dough scraper or bench knife to tighten the dough into a ball. *Note the ball of dough will not be as perfectly smooth as a ball of gluten-based sourdough. It will look slightly rough and shouldn’t be overworked because it will become more sticky and messy. If your dough is getting too sticky, add more tapioca starch to your hands and work surface.
- Once it is in a tightened ball, quickly slide the scraper underneath, then pick the ball of dough up and flip upside down into the floured proofing bowl.
Proofing (Two Steps)
- Cover both bread doughs with plastic wrap or a plastic shower cap.
- Leave at room temperature to rise for 1-2 hours (1 hour in warm weather, 2 hours in cold weather).
- Then, transfer the doughs to the fridge to do a long cold proof for 4 hours to overnight (up to 12 hours).
- The dough will rise to almost double in volume.
Preheat the Oven
- If you are baking boules in a Dutch oven, preheat the Dutch oven with the oven. Preheat oven to 500 degrees F.
- If you are baking a sandwich loaf and are using the manual steam method(linkhere) then preheat a pan filled with 1-2 inches of water in the oven. Preheat oven to 500 degrees F.
Bake the Bread: Boule/Country Bread Method
- Before baking, you’ll need to score your bread by using a bread lame or bread knife to cut a slash for the steam to escape.
- For a boule or round loaf, place a large piece of parchment paper over the proofing bowl and by tightly holding the edges, flip the bowl over so that the dough is now right side up on the parchment. Cut a slit that is about ¼ inch deep in the center along the length of the top of the dough or you can cut an X shape on top.
- Carefully take the hot Dutch oven out of the oven, oven and place the scored round ball of dough into the center of the Dutch oven by lifting it by the edges of the parchment. Firmly close the Dutch oven to seal the dough inside.
- Repeat with the other boule if you are baking two boules.
- Place the Dutch oven(s) back into the hot oven. Close the door and reduce the oven temperature to 450 degrees F for 35 minutes. After that time, very carefully remove the bread from the Dutch oven and place directly on the oven rack to bake for 15-20 minutes longer at the same temperature.
Cool the Bread
- Place the boules on a cooling rack to cool. If you baked sandwich loaves, carefully remove from the loaf pan to cool on the cooling rack.*
- Cool the bread for at least 3 hours to let the crumb fully set to avoid a gummy loaf.
Notes
- Shaping the Dough: Sandwich Loaf Method
- Generously grease your sandwich pan(s) with coconut oil or other oil or use a parchment paper liner (see the tutorial in this post to make a parchment liner).
- Flour the work surface with white rice flour or tapioca starch then place a portion of dough on the flour. Pat the dough to flatten slightly to a 8 inch by 10 inch oval then fold the longer sides in to the middle so that the overlap and stick together. Then from the far end, roll the dough toward yourself to seal the seam you made into the middle of the dough. Use a dough scraper or bench knife to tighten the dough into a rounded oval shape. (see *note above)
- Quickly slide the scraper underneath and lift the sandwich shaped dough into the prepared loaf pan.
-
. Bake the Bread: Sandwich Loaf Method
- For the sandwich loaf, just cut a slit that is about ¼ inch deep in the center along the length of the top of the dough.
- Repeat with the other sandwich loaf if you are baking two sandwich loaves.
- Place the scored bread(s) into the hot steamy oven. Close the oven to seal in the steam. An option to add extra steam is to crack the oven door and quickly spray the walls of the oven with a water spray bottle four to six times then close the door to seal in steam.
- Reduce heat to 450 degrees F for 35 minutes. After that time, remove steam tray and continue baking at the same temperature for 15 to 18 more minutes.