Sourdough Pan Dulce Conchas (Sweet Shell Bread)
You either know this sweet bread treat or you don’t know what you’re missing! Sourdough Pan Dulce Conchas, translated to sweet shell bread in English, is such a fluffy, sweet, cakey bread with a greater depth of flavor from longer fermentation.
My kids love making the designs in the sugar topping!
This post contains affiliate links. Read my policy here.
Ingredients to make amazing sourdough Pan Dulce Conchas
For the sweet stiff starter
- 55 grams (3 T. and 2 t.) Water
- 15 grams (1 T.) White Cane Sugar
- 30 grams (2 T.) Active Sourdough Starter
- 100 grams (2/3 cup) All-Purpose Flour
For the dough
- 160 grams (1/2 cup and 2 T.) Whole Milk warmed and divided
- 80 grams (1/4 cup and 2 T.) Brown Sugar
- 160 grams (all of prepped starter) Active Starter prepared from step 1
- 480 grams (3 cups and 4 T.) All-Purpose Flour
- 24 grams (2 T. and 2 t.) Lard (unsalted butter, softened is okay to substitute)
- 56 grams (4 T.) Unsalted Butter, softened
- 6 grams (1 t.) Vanilla Extract
- 6 grams (1 t.) Salt
- 2 Eggs
For the topping
- 75 grams (1/2 c.) Powdered Sugar
- 75 grams (1/2 c.) all-purpose flour
- 1 gram (1/8 t.) Baking Powder
- 45 grams (3 T. and 1 t.) Lard softened
- 24 grams (1 T. and 2 t.) Unsalted Butter softened
- 2 grams (1/4 t.) Vanilla Extract
- 1 to 2 grams (1/4 to 1/2 t.) Cinnamon Powder or Cocoa Powder optional
- Food Coloring, optional
Tools for Making Sourdough Pan Dulce Conchas
See the full list of my recommended essentials here: Amazon idea list of Tools All Bakers Need (see affiliate disclosure)
What difference does sourdough make?
The main two reasons I love baking with sourdough are better digestibility and flavor.
Wild yeast in the sourdough starter rise the pan dulce without the use of conventional yeast* (e.g. instant yeast, active dry yeast). And the good bacteria in the starter break down the gluten so it is more digestible.
During the long fermentation required, the starter creates a more complex flavor as starches are made into simpler sugars. This long fermentation creates flavor with more depth than the traditional version.
I also find that breads made with sourdough maintain their moisture longer and don’t go stale as quickly.
*Note: This delicious sourdough based recipe is inspired by a non-sourdough version I made in my book Celebrate with Bread Baking!
Want more sourdough info?
You can get my free Quick Start Sourdough Guide to begin learning some of the key parts of the cycle of sourdough starter.
Learn the phases, the signs of an active, how to care for a sourdough starter to keep it alive and thriving, as well as how to make your own sourdough starter.

Sourdough Sweet Bread
The flavor in the bread reminds me of the flavor of cookie dough. The brown sugar makes this dough uniquely flavored
Everyone who tastes these loves the incredible flavor and the soft, fluffy, moist sweet breads.
Long fermentation takes longer with rich breads
Fermentation speed depends on time and temperature, but it also varies based on ingredients.
Sugar in bread dough speeds up fermentation as well as certain flour types like rye and whole wheat. The sugars are easier for the yeast to eat so the fermentation is faster.
But fats like whole milk, butter, oil, and eggs slow fermentation down since the yeast and good bacteria do not consume fats like easy to consume foods like starch and sugar.
So plan your bake schedule by looking through the steps because short cutting the proof will not give you the optimal results.
When is the dough done fermenting?
For the bulk ferment (when the dough is in a bowl or container and not shaped yet), the dough should double in volume and be tacky but not so sticky that it’s still to your fingers.
In this post I describe what to look for with a video.

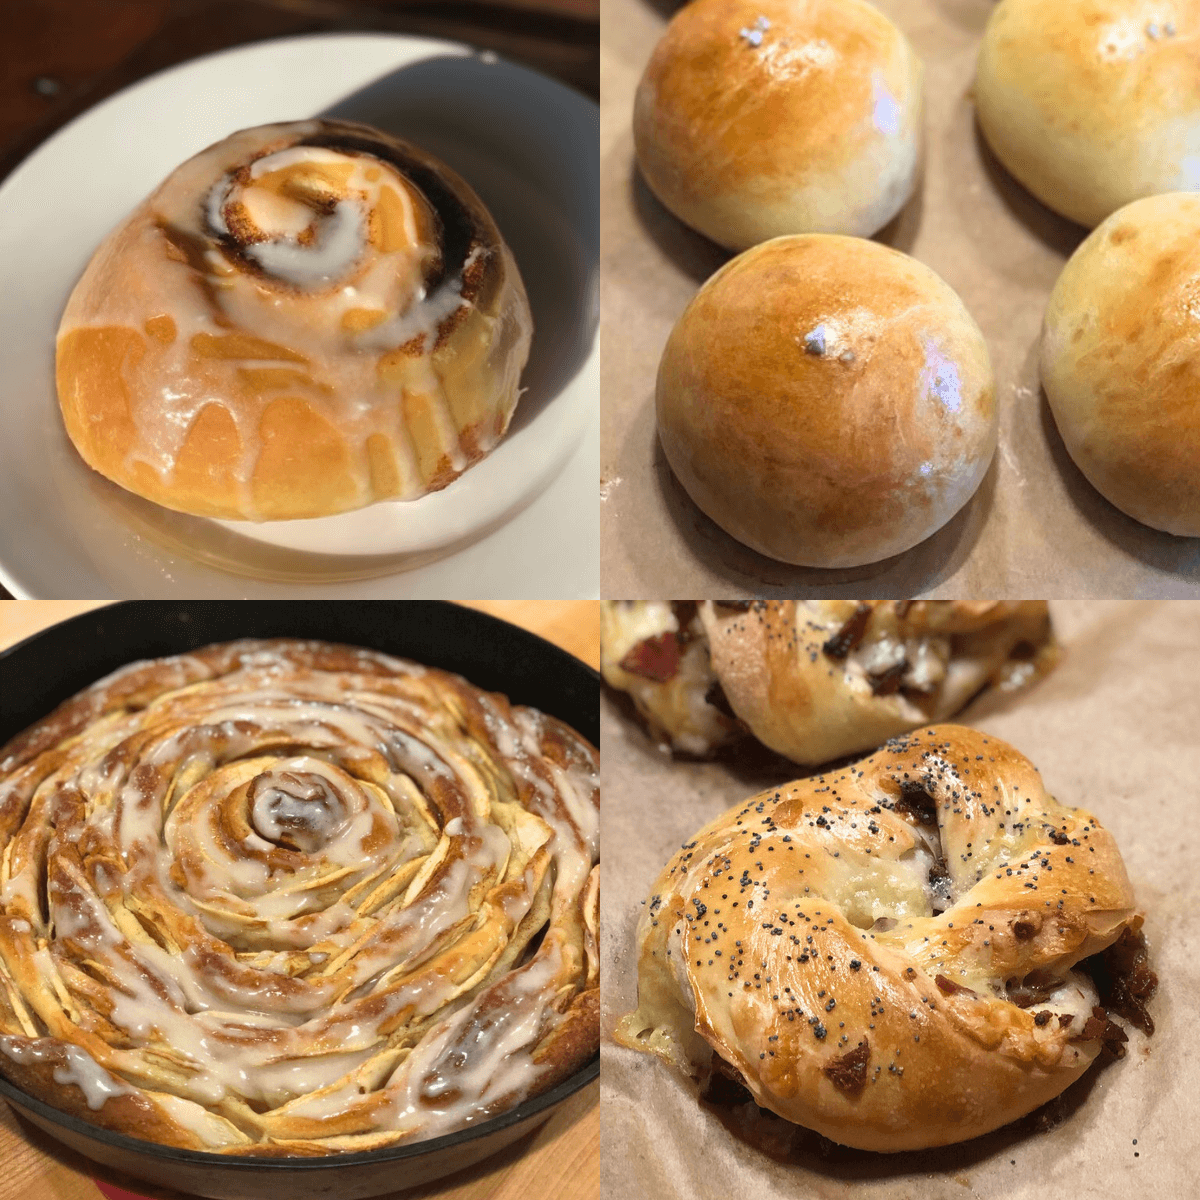
Designing the pan dulce conchas (sweet shell breads)
The sugar topping is easy to put together and is really fun to decorate.
Traditionally the top is scored in curved lines to look like a seashell. But my kids and I have enjoyed cutting cross hatch patterns, leaves, spiders at Halloween, and lots of other designs.
It is important to only cut through the sugar topping and not cut the dough so I have found that a butter knife works best.
To avoid using unfermented flour, you could substitute a gluten-free all purpose flour blend or cassava flour.
What occasion would you make them for?
These are festive sweet breads and could work for many occasions!
When you add the food coloring to the sugar topping, you could coordinate it with the holiday.
These would be a traditional dessert to enjoy for Cinco de Mayo or Day of the Dead.
We have made them three years in a row for Halloween at my son’s insistence and now they’ve been proclaimed an annual tradition.
Making the bread
Sourdough Pan Dulce Conchas are a new favorite for our kids!
Check out the fast motion video at the bottom of the post to get an idea of what the process looks like.
Just getting started with sourdough?
A competent guide transforms sourdough baking from overwhelming to uncomplicated and fun!
Get My Free Quick Start Sourdough Guide: Learn the key terms and concepts in sourdough baking, including the differences between active sourdough starter and sourdough discard, and how to care for your starter.
Start Baking Sourdough Confidently—Take the Intro to Sourdough Course for Just $27!
Time Planning Help for Sourdough Baking
The #1 need for sourdough bakers is help with time planning, so I created a resource for you.
Sourdough Time Planning Workbook: Perfect for new or experienced bakers, this workbook includes 8 templates ready to fill in and a baking journal. The templates cover 4 different ways to make classic sourdough country breads, 3 time planning worksheets for enriched sourdough bread depending on serving time target, and a blank template. The baking journal goes over baker’s percentages and how to take notes on your sourdough bakes.
Get a free sample of the workbook: Use this sourdough time planning worksheet sample to simplify your baking.

Living Bread Baker posts mentioned
Shop this post
Intro. to Sourdough online course
Vietnamese Cinnamon (my go to in all my baking)
Celebrate with Bread Baking book
This post contains affiliate links. Read my policy here.

Sourdough Pan Dulce Conchas
Equipment
- Food Scale
- Saucepan or Small Pot
- Parchment Paper
- Cooling Rack
- Dough Scraper
- Flat Baking Sheets
Ingredients
For the starter
For the dough
- 160 grams Whole Milk warmed and divided, 1/2 cup and 2 T.
- 80 grams Brown Sugar 1/4 cup and 2 T.
- 160 grams Active Starter all of the prepared sweet stiff starter from step 1
- 480 grams All-Purpose Flour 3 cups and 4 T.
- 24 grams Lard (unsalted butter, softened is okay to substitute), 2 T. and 2 t.
- 56 grams Unsalted Butter, softened 4 T.
- 6 grams Vanilla Extract 1 t.
- 6 grams Salt 1 t.
- 2 Eggs
For the topping
- 75 grams Powdered Sugar 1/2 c.
- 75 grams all-purpose flour 1/2 c.
- 1 gram Baking Powder 1/8 t.
- 45 grams Lard softened, (3 T. and 1 t.)
- 24 grams Unsalted Butter softened, (1 T. and 2 t.)
- 2 grams Vanilla Extract 1/4 t.
- 1 to 2 grams Cinnamon Powder or Cocoa Powder optional, (1/4 to 1/2 t.)
- Food Coloring optional
Instructions
- Make the starter: Use an active sourdough starter (this is ideal). Mix together the thick sweet starter. Leave it at room temperature to ferment and become active for 8 to 12 hours.
- Warm milk: Measure out at least 170 grams of milk into a pot (some will evaporate while it is heated). Heat milk over medium heat until you begin to see steam rising off it or reaches a temperature of 115 – 120º F.
- Scale: Add 150 grams of the warm milk to the mixing bowl, add in the sugar and 160 grams of the starter prepared in step 1. Allow the sugar to dissolve. (Remember to use the scale’s tare function to remove the weight of the bowl and previous ingredients to only weigh the current item added) Add the flour, lard*, and butter.
- Mix: Mix ingredients until a shaggy dough is formed, then add vanilla extract, salt, 10 grams milk, and eggs. Continue mixing dough using the spoon and a dough scraper to scrape the sides of the bowl. (Mixing and kneading steps can be done in a stand mixer for 3 to 7 minutes with a dough hook on lowest two speeds, if available.)
- Knead: Fold and knead dough 10-15 minutes or until dough is smooth, no longer sticky, and releases easily from the bowl or work surface.
- Bulk fermentation: Cover the dough and allow to ferment until doubled in volume, about 6 to 10 hours. This dough is very rich, so give it time.
- Prepare the baking sheets: Cut two large pieces of parchment. Place parchment papers on two flat baking sheets.
- Make topping: Scale dry ingredients into a mixing bowl. Stir with a spoon to combine. Add lard, butter, and vanilla extract. Mix until a very smooth paste dough is formed. To make different colors or flavors, divide the paste dough. If dividing in half, for two flavors, add 2 grams of cinnamon powder or cocoa powder and mix until a cinnamon or cocoa colored paste dough is formed. If dividing into thirds for three flavors, add 1 gram of cinnamon or cocoa powder. Color can be added to the white vanilla paste dough as well.
- Divide: Divide dough into 12 equally sized pieces (weighing about 87-88 grams each).
- Shape: Gently press each piece into a small disc then fold edges into center, pinching together to form a seam. Turn dough over onto the seam and rotate dough on work surface with light pressure and quick movements until it becomes a smooth ball. Place ball of dough onto parchment paper lined baking sheet. Gently press down so that the roll is wider and stands about 1-inch high. Repeat with remaining pieces of dough. Balls of dough should be 2 to 3 inches apart on baking sheets.
- Top: Lightly grease the top of the rolls. Divide the paste dough prepared in step 7. Scale 12 pieces weighing about 17 grams each. Roll a divided piece of the paste dough into a ball. Pass back and forth between the palms of your hands to flatten into a thin disc that is wide enough to cover the tops of the rolls. Press the disc on the top of the shaped rolls. Repeat until all the rolls are topped. If you have a concha press, use that to cut pattern into the paste dough. Otherwise, use a regular table knife to cut curved lines or a crosshatch pattern in the paste dough. Take care not to cut the dough of the roll underneath.
- Proof: Cover rolls with plastic wrap and proof in a warm place for 2 to 4 hours, until at least 1.5 times larger, double in size is ideal.
- Preheat: Preheat oven to 375º F.
- Bake: Place rolls into the oven. Reduce oven temperature to 350º F. Bake rolls for 20 to 22 minutes until just turning light golden brown around the bottom.
- Cool: Cool rolls on a cooling rack for at least 20 minutes before serving. These are best enjoyed fresh.


Why AP flour versus bread flour? Wouldn’t bread flour make them fluffier while AP makes them cakier?
Hi there, In enriched bread recipes all-purpose can give a softer, more tender texture whereas bread flour can be more chewy. I wouldn’t recommend bread flour in certain enriched recipes like panettone that require the highest strength possible. These have an excellent texture and I’m sure bread flour would still make excellent pan dulce. If you try it, let me know!
Does the topping have to have lard ? Or can I just use more unsalted butter or tallow?
Unsalted butter is fine. I haven’t tried tallow but it should work okay as long as the flavor isn’t strong.
Hello! I have a question I’m wondering g if you’ve done it before. After proofing for 6-10 hours is it possible to stick in the fridge to make tomorrow or should I stick it in the fridge before that?
Hi Danielle! If you want to delay the ferment by putting them in the fridge overnight so you could bake in the morning, I would slightly shorten the proof 6-8 hours. Due to the higher butter content, these could be find up to 10 hours and then refrigerated overnight.
If we need to bake the next day- should they be shaped & have topping on before putting in the fridge overnight?
Thanks in advance!
Our family loves this recipe. I’m looking forward to making a few batches for our elementary school teachers this week 🙂
Sounds like a thoughtful idea! I’m sure they’ll love these!
Great question! Yes, an overnight cold proof would work well for these after they are shaped and have topping. I recommend some time proofing at room temp before refrigeration since these are so rich and have a long rise time. Also, I’d give some time for them to come back to room temp to make sure they have the best oven spring.
Hi there. Just made these today and they were hands down the best conchas I’ve had to date. So fluffy and light with that sourdough starter flare. I’m keeping this recipe for the rest of my life.
Hi Calli!! Thank you so much for sharing!!! I love hearing that. My family loves making these (and eating them) too!
These were incredible. I’ve always been unhappy with conchas from the stores. These redeemed them for me! They are soft and pillowy with that lovely sweet crunch on top. I will forever make this recipe!!!
Just realized I commented twice 😅
Hi Calli,
I appreciate hearing from you! Don’t worry! Lol
They blow away store bought ones don’t they?! The base dough is just so delicious and that crunchy top… yum!
I was very skeptical this would ever turn out and boy was I wrong!
I followed the recipe using all butter because I didn’t have any good lard, bulked it for 10-11 hours maybe at room temp about 68F. And proofed the rolls 4 hours before baking. Baked till golden and 210F about inside.
I baked one before the full 4 hours proof (just to see) and it was good but too dense. So be patient.
Thank you for the great recipe. First time making conchas and so happy with them! And sourdough too which gives such great flavor.
Hi Christine, I’m so happy to hear this! Yes, it definitely takes longer to rise with all that butter. But it’s worth it! Glad you enjoyed them and shared your experience!
Help! My dough is too sticky. What can I do to fix this?
Hi Rachel, At what point was your dough too sticky? It is a very enriched dough so it needs quite a bit of kneading but will still be a bit sticky before bulk ferment. After bulk ferment, it should not be too sticky but I do use some flour in the shaping process.
I am Mexican and this is the best recipe I have ever made and the best conchas I eat, I added 1/2 tablespoon of ground cinnamon and a little more vanilla, the first ones I made, , I only let them rest for 2, I made them again and let it rest for 4 hours, they came out much better. Recommend to let rest for 4 hrs before you bake.
That is high praise! Thank you for letting me know! They are so delicious.
I just made these and they are AMAZING!!! Thank you so much! I made a few changes. I used almond milk instead of regular, grass fed butter instead of lard, coconut brown sugar, and brown sugar instead of regular. They came out perfect! Thank YOU!
I love hearing that Nicole! Thank you for sharing your adjustments for others to reference. Thank you for the kind words.
How long can I cold ferment these? I completely messed up and made them a day early😭
Hi Jasmine, Due to the high amount of butter they can cold ferment for 48-72 hours easily. I hope they turned out well!