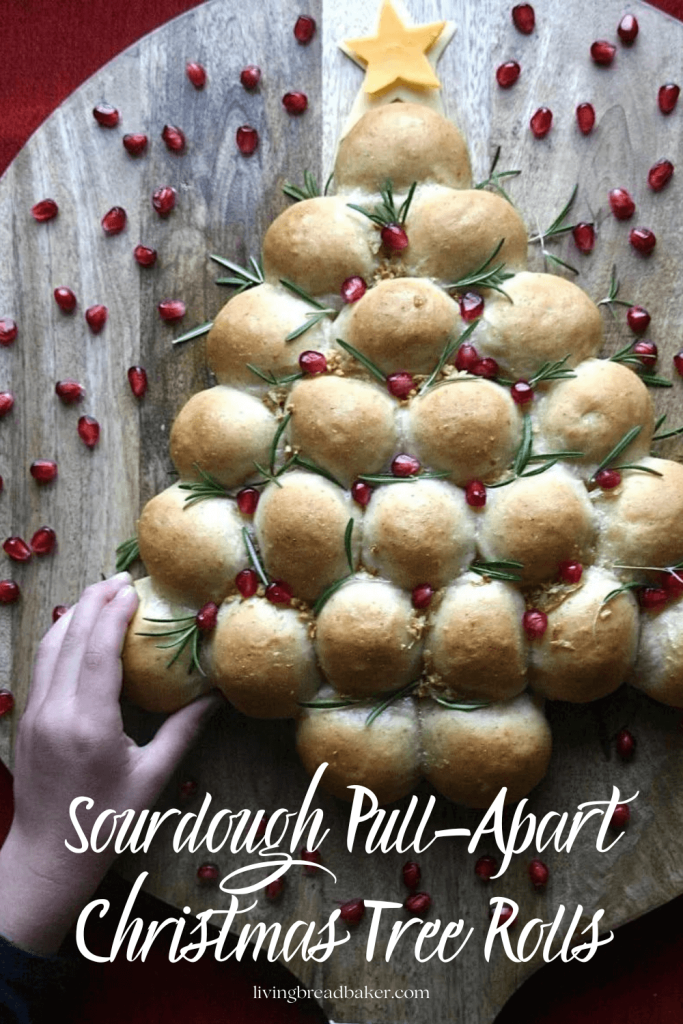
Ultimate Sourdough Christmas Tree Pull-Apart Rolls Recipe
Looking for a festive and delicious addition to your holiday table?
This pull-apart Christmas tree bread is an easy recipe that uses simple ingredients to create a show-stopping centerpiece in the shape of a Christmas tree.
Whether you’re hosting a holiday party or need a perfect side dish, this recipe is sure to impress!
Gathering Tools for Sourdough Christmas Tree Pull-Apart Bread
To ensure that your sourdough pull-apart Christmas tree rolls turn out perfectly, it’s essential to start with the right ingredients and tools. Gather everything you need before you begin so that you can seamlessly move on to the next step: preparing the sourdough starter.
Tools:
- Food scale
- 4-qt Cambro dough bin (optional)
- 2-qt Cambro dough bin or medium bowl for starter
- Baking sheet
- Parchment paper
- Plastic wrap
- Pastry Brush
- Bread serving board (optional)
Ingredients for Sourdough Christmas Tree Pull-Apart Rolls
- For the sourdough starter
- 20g (1 T.) Established sourdough starter
- 100g (1/2 c.) water
- 100g (2/3 c.) All-purpose flour (you can use only bread flour, but I feed my starter all-purpose for nearly all my recipes for cost purposes)
- For the dough
- 370g (2 c. and 7 ½ T.) Bread flour
- 180g (3⁄4 cup plus 2 teaspoons ) Whole milk (add extra to allow for evaporation when scalding)
- 15g (1 tablespoon ) White cane sugar
- 6g (1 teaspoon) Fine salt
- Egg yolk
- 28 grams (2 tablespoons) Unsalted butter
- For topping/garnish
- Garlic cloves
- Fresh rosemary or other herb to garnish (optional)
- Pomegranate seeds to garnish (optional)
- Cheese to cut into star to garnish (optional)
Preparing the Sourdough Starter
Now that you have all the ingredients and tools ready, it’s time to dive into the heart of your sourdough pull-apart Christmas tree rolls: the sourdough starter. This is what gives your rolls their distinct tangy flavor and makes them light, fluffy, delicious, and more digestible.
You must have an established sourdough starter for this recipe, for a version made with traditional yeast you can check out my book Celebrate with Bread Baking. If you don’t have a sourdough starter, check out this post all about sourdough starters or learn how to make one in this article.
Use a 2-quart cambro container or a medium-sized bowl to mix the sourdough starter, also known as a levain.
Combine 20g or 1 T. sourdough starter with 100g (1/2 c.) water and 100g (2/3 c.) all-purpose flour until no dry flour remains. Then cover with a lid or plastic wrap and leave at room temperature for 8-14 hours.
Learn more about sourdough starters in these posts:

Mixing the Dough
Once your starter is active (double in volume and lots of large bubbles–see this post about starters to learn more about the stages), it’s time to mix your dough. Mixing and fermenting the dough is where all the flavors and textures start to develop, creating those irresistible sourdough pull-apart Christmas tree rolls. So let’s dive in and get started!
First, you’ll need to scald or warm the milk. Some of the water in the milk will evaporate so you need to add 200g to a small pot or pan to account for this fluctuation. Heat until you begin to see steam rising or temperature reaches 115-120 degrees F. Let the milk cool down to 80-100 degrees F.
While the milk is cooling, gather all your other ingredients: bread flour, sourdough starter, salt, sugar, egg yolk, and softened unsalted butter.
No need to fret if you don’t have a stand mixer – this recipe can be mixed by hand. Add the warm milk (cooled to 80-100 degrees F) to a mixing bowl followed by the sugar, salt, 200g active starter, the sugar, and bread flour.
Mix until the starter is broken apart and the flour is beginning to absorb the milk, then add the egg yolk. Continue to mix until a dough forms then knead the dough until it is no longer sticking to the bowl or table. Add the softened butter 1 tablespoon at a time and knead until the butter is incorporated and your dough is smooth, soft, elastic, and springs back when you poke a finger into it.
Fermenting the Dough
Next, it’s time to let the fermentation process work its magic. Place your dough into a 4-qt cambro or a clean bowl covered with plastic wrap and leave it at room temperature for 4-7 hours until the dough is double in volume. See this post about how to know when your dough is done fermenting.
Once your dough has completed its fermentation, it’s ready to be shaped into a festive tree. Take a moment to appreciate the transformation that has occurred—the wild yeast from the sourdough starter has been hard at work, breaking down the complex sugars in the flour and releasing carbon dioxide gas, which creates those delightful air pockets in the dough. This natural leavening process results in a wonderfully fluffy and flavorful bread.
Scaling and Portioning the Dough
Line a baking sheet with parchment paper and get out your food scale to divide and scale the dough into 23 equally sized pieces. You could eyeball the portions if you don’t have a food scale but that would be tedious and not recommended.
Use a dough scraper or bench knife to cut portions of the dough that are about 34g each and make sure you end up with 23 equally sized pieces of dough.
If your dough is well fermented it should not be overly sticky. I don’t use flour in the shaping but if you feel more comfortable with a very light dusting of flour, that is okay. Too much flour will make it difficult to tighten the balls during shaping.
Shaping the Dough into a Festive Tree
Take a portion of dough and flatten into a disc then gather the edges into the center and seal firmly with your fingers. To tighten, there are two methods:
- turn the ball over and rotate quickly under your hand until the ball is tight, or
- continue pinching the dough into the center repeatedly until the outside of the ball becomes tight.
I place each ball of dough into the tree shape right after I shape it. The balls of dough should be barely touching so that they can have room to proof and expand into one another.
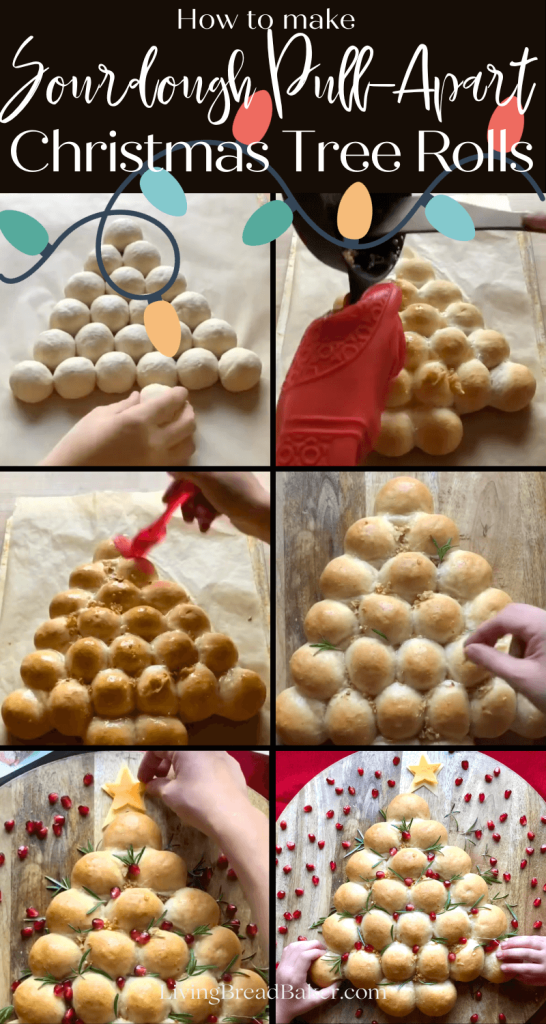
The tree will have 6 rows of dough balls for the tree with a pattern of each row getting one more roll than the previous (row 1 has 1 roll, row 2 has 2 rolls, row 3 has 3 rolls, and so on). The final row is the trunk where you will center two rolls as the base of your tree.
Cover your tree with plastic wrap for 2-5 hours until the rolls are puffy and 1.5-2 times larger. A gentle finger poke should leave an indentation. Here’s a post about how to tell when proofing is done.
In the next section, I’ll take you through the final steps of baking and serving these delightful Christmas tree rolls. So let’s get that oven ready and bring this holiday masterpiece to life!
Baking the Christmas Tree Rolls
Now that your Christmas tree rolls have risen and the oven is preheated, it’s time to bake them to golden perfection. Remove the plastic wrap and gently place the baking sheet in the center of the preheated oven, allowing the rolls to bake for the specified time in the recipe.
While the rolls bake, prepare the garlic butter that you’ll pour over the rolls immediately after they come out of the oven as well as your Christmas tree garnishes.
Once the rolls are golden brown and evenly baked, remove from the oven and pour the garlic butter evenly over the rolls. Use a pastry brush to make sure all the tops, nooks, and crannies are covered in the savory mixture of sautéed garlic and melted butter that will soak into the rolls as they cool.
Garnishing and Serving your Sourdough Pull-Apart Christmas Tree Rolls
Now comes the fun part – serving these mouthwatering Sourdough Pull-Apart Christmas tree rolls to your eager guests. Carefully transfer the rolls onto a festive serving platter and garnish with rosemary and pomegranate seeds or other garnishes that you would like to use.
This ultimate guide has equipped you with everything you need to create delicious and visually stunning sourdough pull-apart Christmas tree rolls. So, put on your apron, dust off your baking skills, and embark on a festive baking adventure. As you bite into these mouthwatering rolls, remember that the magic of this season lies not only in the flavors but in the joy of sharing homemade creations. As Julia Child once said, “A party without cake is just a meeting.” Happy baking!
Variations for Pull-Apart Christmas Tree Bread
This pull-apart Christmas tree bread is incredibly versatile! Here are some fun and festive ways to customize the recipe using different flavors, shapes, and ingredients:
1. Cheesy Stuffed Rolls
- Place about a teaspoon to tablespoon size of cheese into the piece of dough before sealing.
- Swap mozzarella sticks for shredded cheddar, gouda, or a combination of cheeses for a unique twist.
- Add a sprinkle of Parmesan cheese inside each roll for extra flavor.
2. Savory Additions
- Brush the bread with olive oil instead of butter, and sprinkle with Italian seasoning or red pepper flakes for a spicy kick.
- Incorporate finely diced pepperoni, crumbled bacon, or cooked sausage into the piece of dough before sealing.
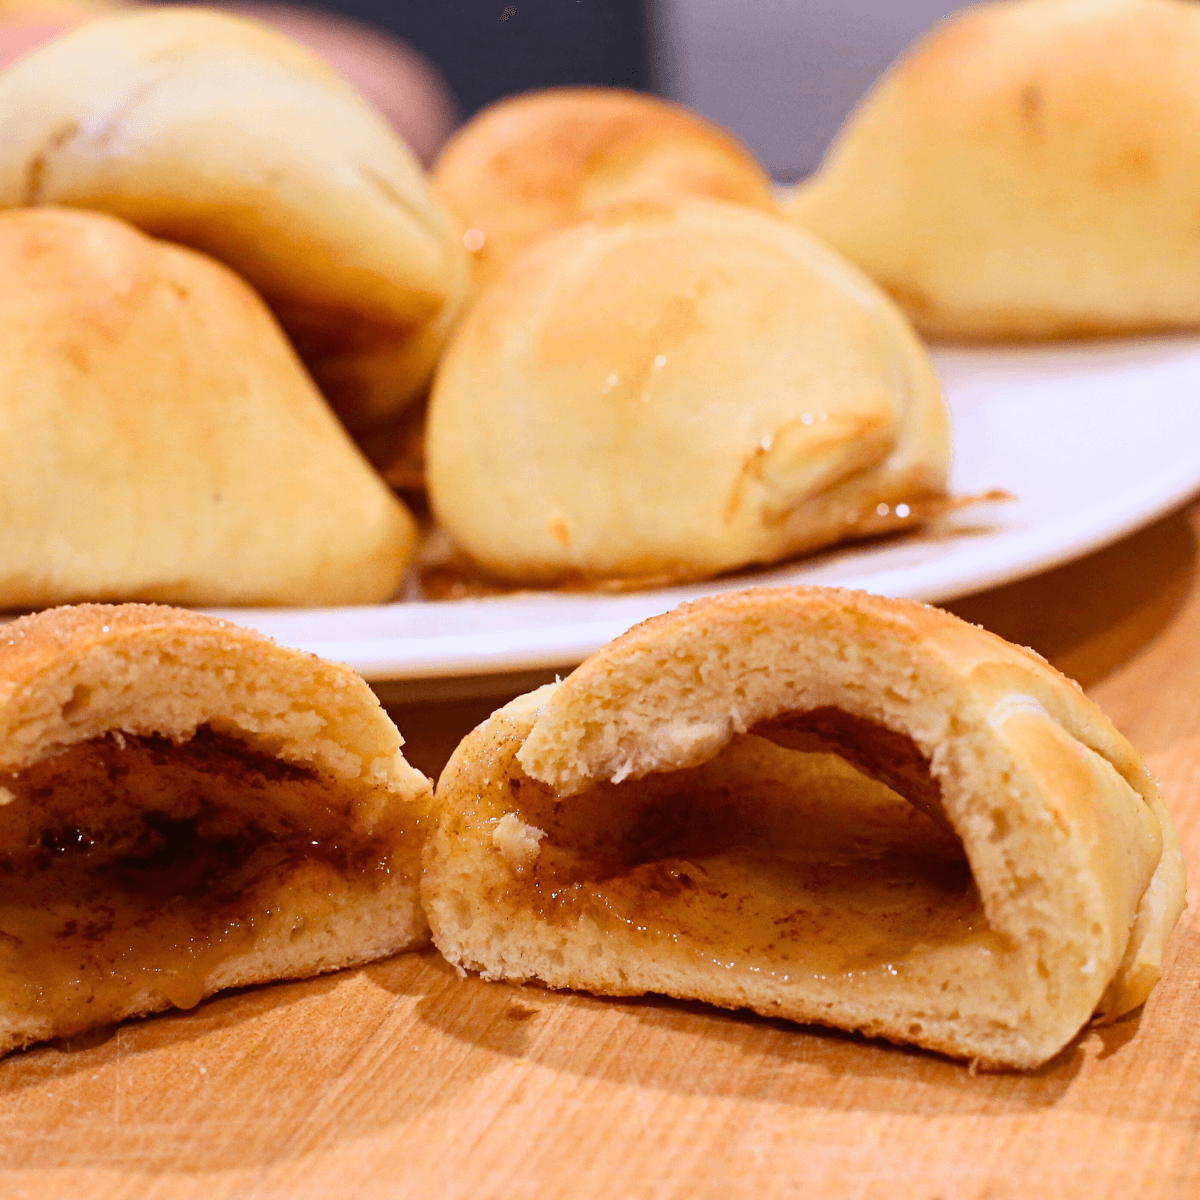
3. Sweet Version
- Make a dessert version by stuffing the rolls with cream cheese sweetened with brown sugar and cinnamon.
- Drizzle with a powdered sugar glaze after baking for a holiday treat that’s perfect for your Christmas party.
4. Using Different Doughs
- Try crescent rolls, store-bought pizza dough, or even breadsticks from the grocery store for convenience.
- Experiment with whole wheat or herbed dough for a gourmet touch.
5. Shape Variations
- Instead of the Christmas tree shape, try a wreath or star design for other festive presentations.
- For kids, create smaller trees or fun shapes like snowmen!
6. Sauce Pairings
- Serve with a variety of dips like favorite marinara sauce, garlic butter, or even ranch dressing.
- For a holiday flair, add a side of pizza sauce and garnish with basil leaves to mimic a Christmas garland.
7. Charcuterie Board Integration
- Make smaller rolls to add to a Christmas charcuterie board as a savory bread option. They pair perfectly with cured meats, cheeses, and festive garnishes.
Why You’ll Love This Recipe
- Festive Ways to Celebrate: Perfect for a Christmas charcuterie board or as part of a Christmas party spread.
- Next Day Enjoyment: Store leftovers in an airtight container and reheat for a snack the next day.
- Versatile Ingredients: Swap the dough for crescent rolls to make the tree shape or make this dough into breadsticks for a quick twist!
More Sourdough Recipes for the Holiday Season
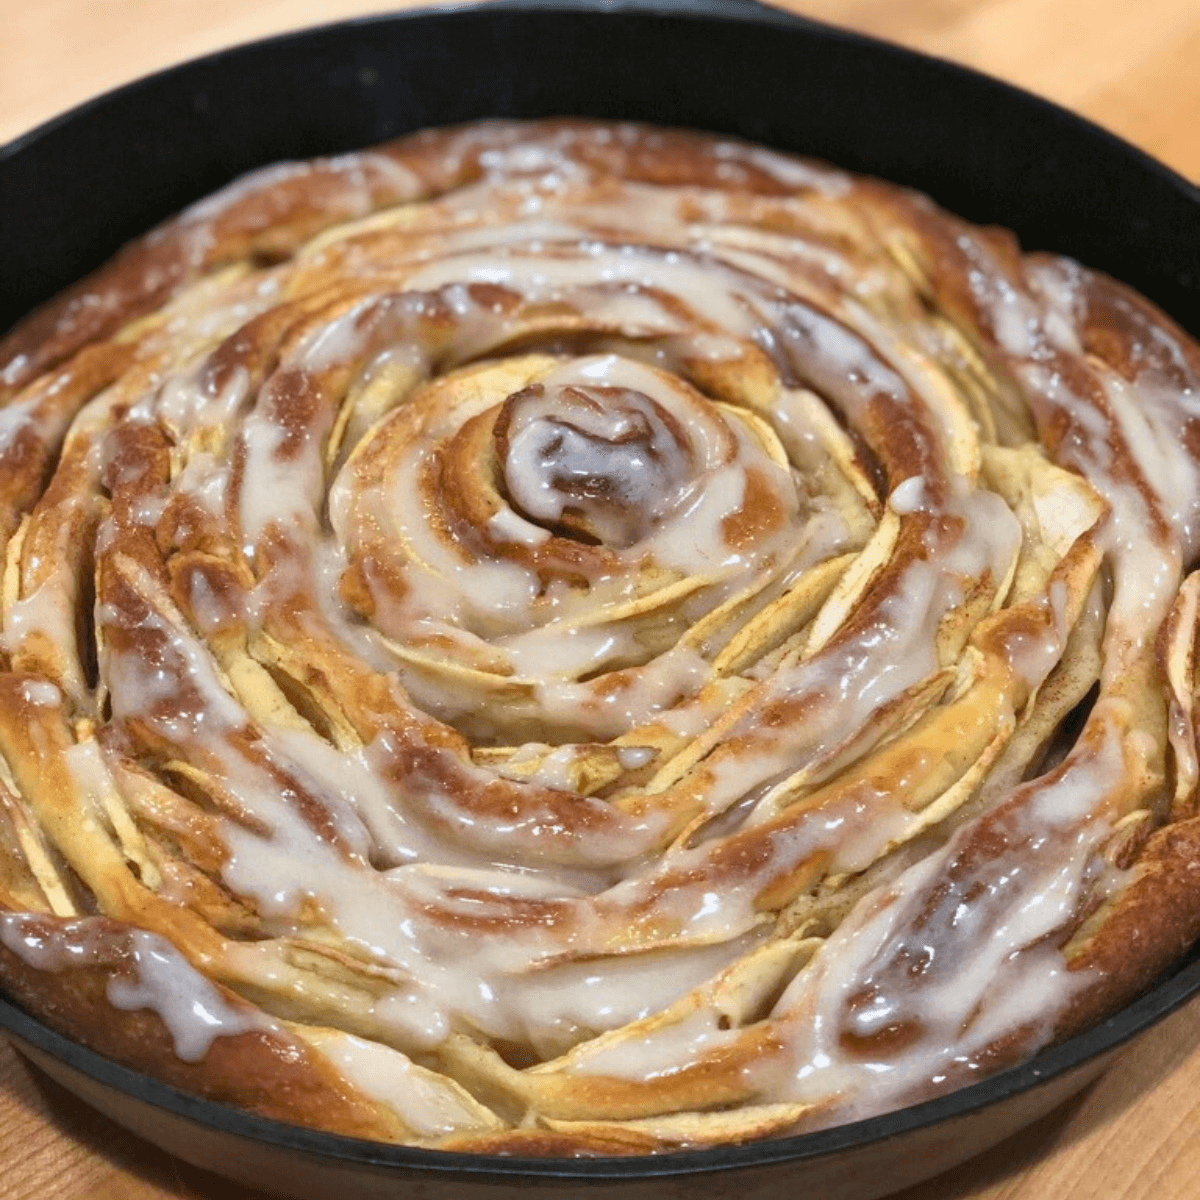
- Sourdough Cinnamon Twist Wreath Bread (our family favorite!)
- Easy Sourdough Cinnamon Rolls Recipe (Soft and Fluffy)
- How to make Sourdough Chai Spice Star Bread Recipe
- Sourdough Jam-Filled Star Bread
- Sourdough Chocolate Orange Babka
- Savory Sourdough Cheese Herb Babka Bread Recipe
- Soft, Fluffy Sourdough Discard Sugar Cookies
- Gingerbread Scones with Eggnog Icing (Sourdough Discard) (my weakness. yum!)
Troubleshooting Tips
Hopefully you follow the steps of this recipe thoroughly and don’t need this tips. If you are getting stuck or have a question, I hope these help:
- If you have too much milk evaporation when you go to add 180g to the mixing bowl, warm an additional small portion of milk to make up the difference.
- For optimum dough development, I recommend doing 1-3 stretch and folds. Do these each within 30 minutes of each other at the beginning of the bulk fermentation. This post has a section about stretch and folds.
- When scaling the portions of dough, 1-2g of variation is ok, but try to get them all roughly the same weight.
- During the shaping process, if you are finding the dough very sticky and difficult to work with, you may not have let it go through the bulk ferment stage long enough. My best recommendation is to put all the unshaped dough portions onto a cookie sheet and wrap it tightly in plastic wrap so that the dough doesn’t dry out and let it ferment for 1-2 more hours.
- Delaying your dough can be done during the bulk fermentation or the proofing stage. Here are two methods:
- This can be done by allowing the dough to rise the specified amount and time then putting the dough into the fridge. This allows you to delay all activity until you are ready to do the next step. Let the dough sit at room temp for about 30 minutes to return to room temperature.
- Alternatively, you can put the dough into the fridge at the beginning of the bulk ferment or the beginning of the proof to delay the next step. However, when you take your dough out it will take longer to rise to finish its bulk ferment or proof due to the cold starting temperature.
If you’re getting ready for Christmas, use the share button to make sure your fellow sourdough bakers they have this recipe.
After you try it, send me a note, leave a review comment, or tag me on facebook or instagram @livingbreadbaker
I enjoy seeing how you share this bread for the holiday with your family and friends. I’m glad I can be a part of your special holiday in some small way.
Just getting started with sourdough?
A competent guide transforms sourdough baking from overwhelming to uncomplicated and fun!
Get My Free Quick Start Sourdough Guide: Learn the key terms and concepts in sourdough baking, including the differences between active sourdough starter and sourdough discard, and how to care for your starter.
Get My Free Sourdough Starter Making Workbook: Follow the steps in my workbook to make your own sourdough starter from scratch in 7 days or less!
Start Baking Sourdough Confidently—Take the Intro to Sourdough Course for Just $27!

Time Planning Help for Sourdough Baking
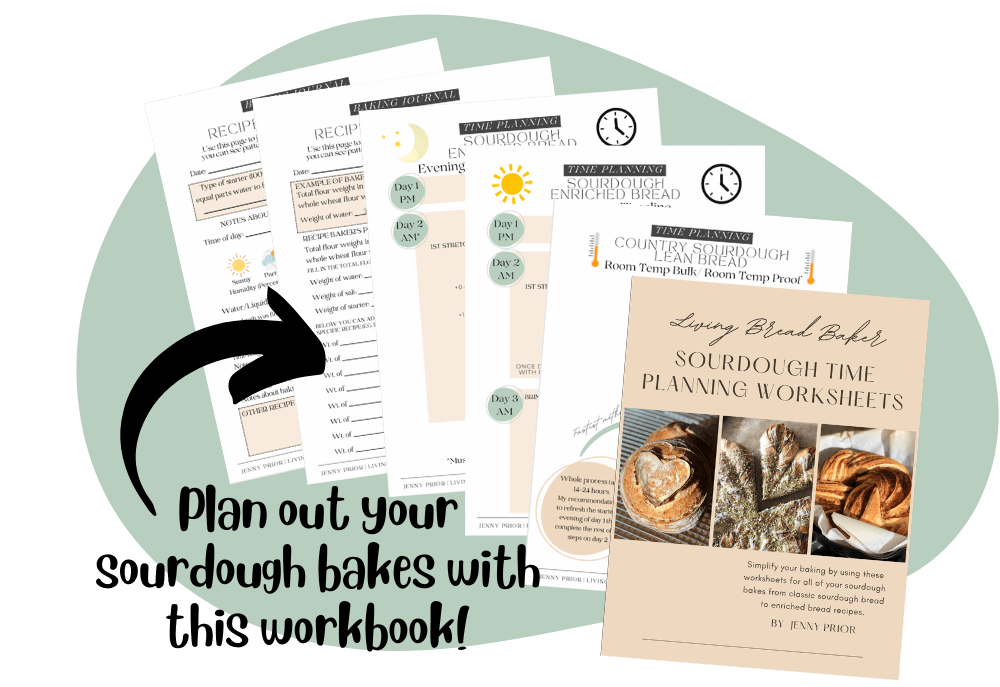
The #1 need for sourdough bakers is help with time planning, so I created a resource for you.
Sourdough Time Planning Workbook: Perfect for new or experienced bakers, this workbook includes 8 templates ready to fill in and a baking journal. The templates cover 4 different ways to make classic sourdough country breads, 3 time planning worksheets for enriched sourdough bread depending on serving time target, and a blank template. The baking journal goes over baker’s percentages and how to take notes on your sourdough bakes.
Get a free sample of the workbook: Use this sourdough time planning worksheet sample to simplify your baking.
Get my free menu planning template: I use this template to plan my groceries, all our meals, and cooking and sourdough baking prep.

Living Bread Baker posts mentioned
When is sourdough bulk fermentation finished?
When is sourdough finished proofing?
Christmas sourdough bread recipes
Shop this post
4-qt Cambro dough bin (optional)
2-qt Cambro dough bin or medium bowl for starter
FREE Sourdough Quick Start Guide
My Intro. to Sourdough online course
This post contains affiliate links. Read my policy here.

Sourdough Pull-Apart Christmas Tree Rolls
Ingredients
FOR THE STARTER
- 20 g sourdough starter 1 T.
- 100 g water 1/2 c
- 100 g all-purpose flour 2/3 c.
FOR THE DOUGH
- 180 grams warm whole milk 3⁄4 cup plus 2 teaspoons
- 15 grams white cane sugar 1 tablespoon
- 6 grams salt 1 teaspoon
- 200 grams active sourdough starter 1 ¼ cup
- 370 grams bread flour 2 c. and 7 ½ T.
- 1 egg yolk
- 28 grams unsalted butter, softened 2 tablespoons
FOR THE TOPPING
- 32 grams unsalted butter 3 tablespoons
- 2 garlic cloves
- 1-2 sprigs fresh rosemary for garnish pomegranate seeds, for garnish
Instructions
- Make the starter: 8 to14 hours before mixing your dough, mix ingredients for starter in a bowl. Cover and leave at room temperature to become active. It will double in volume and become full of bubbles.
- Warm milk: Measure out at least 200 grams of milk into a saucepan (some will evaporate while it is heated so add a little extra to account for evaporation). Heat milk over medium heat until you begin to see steam rising off it or reaches a temperature of 115 to 120 degrees F. Let it cool down to 80-100 degrees F.
- Scale: Once cooled, add 180 grams of the warm milk to the mixing bowl. Add the sugar, salt, and 200 grams starter. Allow the sugar and salt to dissolve. (Remember to use the scale’s tare function to remove the weight of the bowl and previous ingredients to only weigh the current item added) Add the flour.
- Mix: Stir ingredients to begin to combine the flour with the liquid, then add the egg yolk. Continue mixing dough using the spoon and a dough scraper to scrape the sides of the bowl. (Mixing and kneading steps can be done in a stand mixer with a dough hook if available.)
- Add butter: Add the butter once the dough is beginning to become smooth and continue mixing and kneading the dough.
- Knead: Knead dough 10-15 minutes (4-7 minutes on lowest two speeds in a stand mixer) or until dough is smooth, no longer sticky, and releases easily from the bowl or work surface.
- Bulk fermentation: Cover the dough and allow to ferment until doubled in volume, about 4 to 7 hours. Alternatively, the dough can bulk ferment in the fridge after the room temperature 4-7 hours or after.
- Stretch and folds: At least 30 minutes into the bulk fermentation, to further strengthen the dough, pull one quarter of the dough upwards and fold it over the middle. Repeat this process with the other three quarters of the dough. Re-cover the dough. This step can be done every 30 minutes, up to 3 times, during bulk fermentation for maximum development of dough strength.
- Prepare baking dish: Get out a large baking sheet and a large piece parchment paper. Place parchment paper on top of baking sheet.
- Divide dough: Divide dough into 23 equal pieces (about 34g each). Weigh each piece to make sure they are roughly the same weight.
- Shaping: Take a piece of dough and flatten it into a disc then gather the edges into the center and pinch to seal. Pull the edges of the ball into that same seam to tighten further. Turn the dough over onto the seam and rotate briskly under a cupped palm to tighten into a smooth ball. Repeat with the remaining pieces of dough. Note: you can arrange the balls of dough one- by-one as you shape or shape them all first then arrange.
- Arrange the tree: The tree will consist of seven rows; 1 roll on row 1, 2 rolls on row 2,3 rolls on row 3, 4 rolls on row 4, 5 rolls on row 5, 6 rolls on row 6, and finishing with 2 rolls centered at the bottom for row 7 to create the trunk of the tree.
- Proof: Cover and proof in a warm place 2 to 5 hours until rolls are puffy and about 1.5-2 times larger. A gentle finger poke should leave an indentation.
- Preheat: Preheat oven to 375 degrees F.
- Bake: Bake 20 to 25 minutes until rolls are golden brown.
- Make the garlic butter: While the rolls are baking, in a small saucepan, melt the butter. Add the minced butter and sauté until fragrant and translucent. Turn off the heat and set aside. As soon as the rolls come out of the oven, pour the garlic butter over the top.
- Cool: Let cool for 5-15 minutes to soak in the butter before adding garnishes.
- Garnish: Add sprigs of rosemary and pomegranate seeds or other colorful herbs or garnishes.
- Serve: Serve on a charcuterie tray or large cutting board. Pull apart and enjoy! Tastes delicious on its own or with warmed brie.
Video