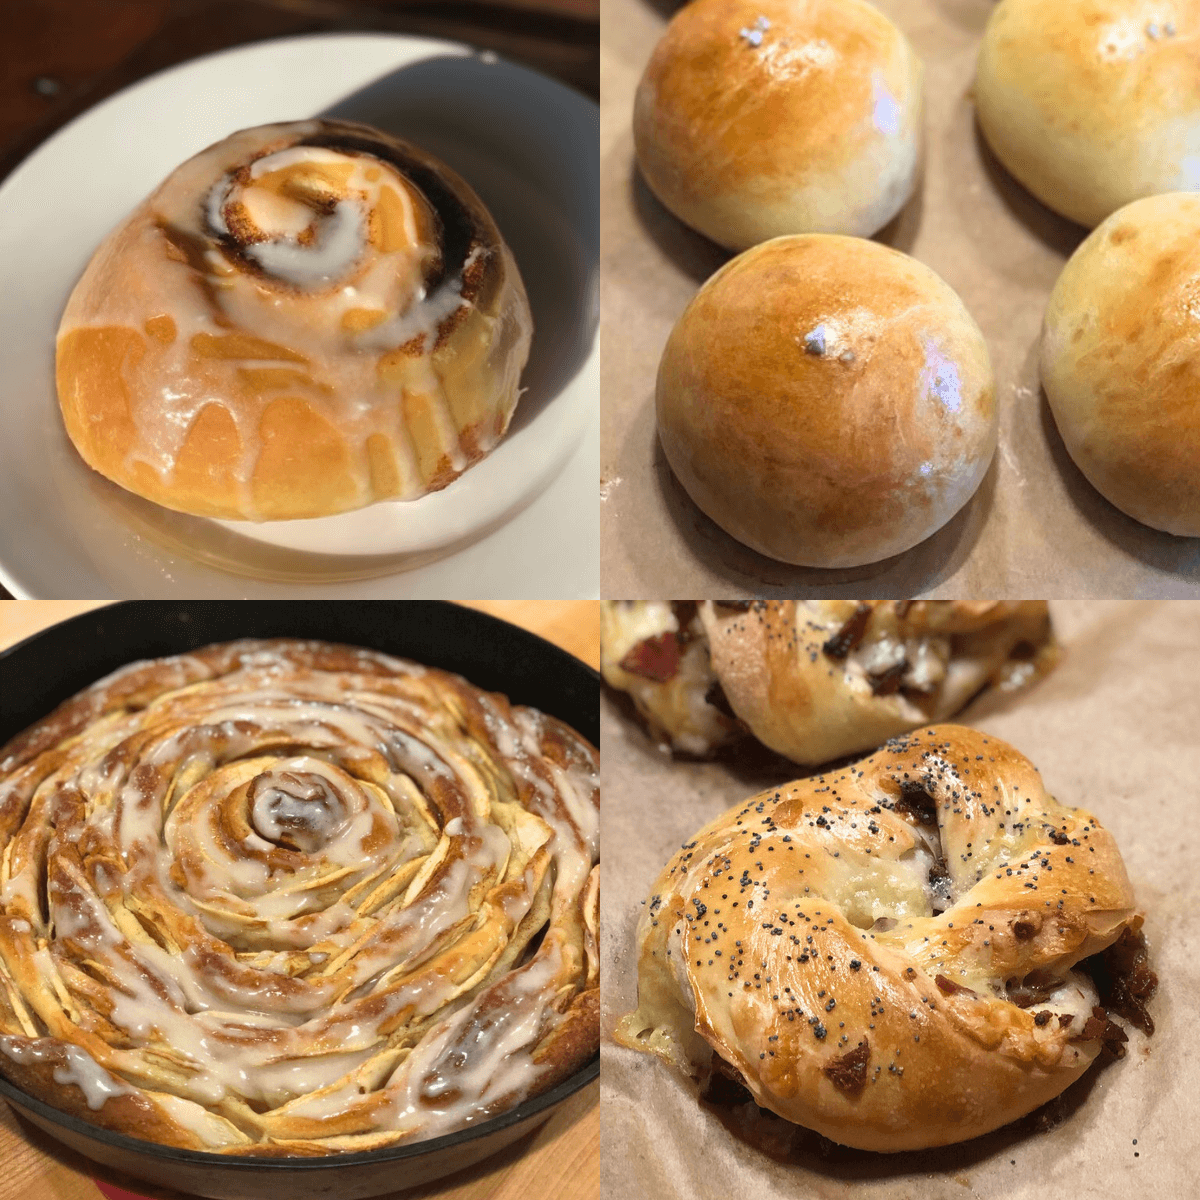
Sourdough Kanelbullar (Swedish Cinnamon Cardamom Knots)
Use the power of sourdough to create tantalizing Sourdough kanelbullar (Swedish Cinnamon Rolls) with an incredible depth of flavor and a soft, airy texture.
From getting started with sourdough to achieving the perfect flavor and unleashing your creativity, this guide has got you covered. Plus, find troubleshooting tips to overcome any obstacles along the way. So, get ready to elevate your baking game and create the most delicious sourdough kanelbullar.
This recipe originally appeared in my book Celebrate with Bread Baking, but I adjusted a few parts of the recipe to make it 100% sourdough.

Getting Started with Sourdough
To begin your sourdough baking journey, it’s important to understand the fundamentals of working with sourdough starter. This living organism is the key to achieving the distinct flavor and texture that sets sourdough kanelbullar apart.
Sourdough makes this version of kanelbullar unique because not only are they more digestible, but the fermentation timeline makes the overall timeline longer than versions made with conventional store bought yeast.
This recipe also uses less sugar than more traditional versions for two important reasons:
- Sourdough and long fermentation gives the dough the time to develop more flavor so using large amounts of sugar isn’t needed, whereas conventional yeast breads use a lot of sugar to have a good flavor in a short timeline.
- Too much sugar in sourdough recipes can cause the fermentation to progress too quickly because it creates a large amount of available food for the wild yeast. This is an issue because we want our sourdough bread to be more digestible which means that the flour needs to be the primary source of food for the wild yeast.
But fear not, even if you’ve never worked with sourdough before, we’ve got you covered with step-by-step guidance to get you started. See this post all about sourdough starters or get my free Sourdough Quick Start Guide!

Culture of Sourdough Kanelbullar
Speaking of culture… sourdough starter, culture… anyway… Kanelbullar comes from Sweden and is known to the Swedish as “cinnamon snails”.
There is a tradition known as Fika in Sweden when people pause in their day to enjoy coffee, some pastries like kanelbullar, and spend time with others. This pause in the day provides a sense of calm and connection.
October 4th is actually Kanelbullar Day in Sweden! A holiday dedicated to a pastry sounds like a fun tradition to me!
The fillings are not always cinnamon sugar. There are many kinds of kanelbullar, but this cinnamon filled one with a hint of cardamom in the dough is very traditional and delicious.
I hope that you can experience a pause of calm and connection when you enjoy these with your family and/or friends!

Mastering the Art of Kanelbullar
Mastering the art of Kanelbullar goes beyond simply following a recipe. It involves honing your skills and understanding the techniques that will elevate your baking to a whole new level.
In the next sections, we’ll explore the essential steps and expert tips that will help you achieve the perfect flavor in your sourdough kanelbullar. Get ready to infuse your buns with irresistible aromas and flavors!
Achieving the Perfect Flavor
When it comes to baking sourdough kanelbullar, a key aspect that separates a good bun from a truly exceptional one is the flavor. By carefully selecting and combining the right ingredients, as well as understanding how to optimize the fermentation process, you can infuse your kanelbullar with amazing flavors.
To achieve the perfect flavor, start by using high-quality ingredients. Sourdough kanelbullar relies heavily on the taste and texture provided by the dough, so it is crucial to use the best ingredients available.
Flour
Choose a quality flour that is fresh and from a reputable mill. Organic flour is a great choice. For white flour, organic isn’t always necessary if you choose a good brand. King Arthur Flour and Central Milling Company are two that I trust for good quality white baking flours.
Spices
This recipe adds cardamom to the dough which creates a unique twist. And the hint of cardamom pairs beautifully with the cinnamon in the filling. Here are my favorite sources for these spices:
In addition to the filling, the fermentation process plays a crucial role in developing the perfect flavor in your sourdough kanelbullar. Take your time and allow the dough to rise slowly and fully. This not only improves the texture but also enhances the flavor.
Fermentation & Flavor
The longer fermentation time allows the sourdough starter to develop and create a more complex taste. You can consider employing techniques such as overnight proofing in the refrigerator, which can contribute to a deeper, more nuanced flavor. To do this, allow the dough to proof until expanded to 1 1/2 times in size up to 4 1/2 hours then put in the fridge overnight and bring it out to come to room temperature for 30-60 minutes in the morning.
By combining superior ingredients, experimenting with flavors, and patiently nurturing the fermentation process, you can achieve a level of flavor in your sourdough kanelbullar that will create a memorable breakfast or brunch with your family or friends.
Troubleshooting Tips for Sourdough Kanelbullar
In this section, I’ll provide you with troubleshooting tips to ensure your sourdough kanelbullar turn out perfectly every time.
Fermentation Tips
One challenge you might face is dough that fails to rise properly. If your sourdough kanelbullar are not reaching the desired level of rise, it could be due to a weak or inactive sourdough starter. To ensure an active starter, make sure you maintain regular feedings and avoid using a starter that hasn’t been refreshed recently. Additionally, allowing the dough to rise in a warm environment on a upper shelf or near a heat source can be helpful.
Bonus to this sourdough recipe is that there are no eggs in the dough which is a controversial topic among sourdough bakers. Many people are apprehensive about leaving dough at room temperature for hours when there is raw egg in the dough. If that’s a concern, you have nothing to fear here!
For my bulk ferment, I like to put my dough into an airtight container. I use a 4-qt. Cambro container and lid set which also has measurement lines to gauge the volume growth.
Make sure to see these posts on bulk fermentation and proofing to learn the signs
Shaping Tips
Bakers may also encounter difficulties when shaping their kanelbullar. If you’re finding it challenging to roll the dough into a tight spiral, there are a few tricks you can try.
First, make sure your dough has properly fermented and has reached the ideal consistency. If the dough is too sticky, lightly flour your work surface and rolling pin to prevent sticking. Make sure to firmly press the uncoated edges together to create a good seal of the dough around the filling before cutting the strips.
Please note, having perfect uniform knots is not the goal. I love how there’s a consistent shape but they have a more rustic shape than American style cinnamon rolls.
See the video linked above to see how to shape these rolls.
Baking Tips
Lastly, achieving the perfect golden-brown color on your kanelbullar can sometimes be a challenge. If you find that your pastries aren’t getting an even golden brown color, rotate pan then switch the bake mode to convection and add 1-2 minutes, keeping a close eye on the bake.
By addressing these common troubleshooting areas and arming yourself with the knowledge to overcome them, you’ll be well-equipped to create stunning and delicious sourdough kanelbullar. So let’s dive in and troubleshoot our way toward baking perfection.
Get the coffee ready for Sourdough Kanelbullar
You now have the essential knowledge and techniques to elevate your baking skills and create mouthwatering sourdough kanelbullar.
As you continue your baking journey, don’t be afraid to push the boundaries and unleash your creativity in the kitchen. Have fun exploring new flavor combinations and innovative techniques. With each batch of sourdough kanelbullar, you have the opportunity to refine and improve your skills, making each batch better than the last.
Remember, the perfect batch of sourdough kanelbullar is just a recipe away. Just make sure you have some fresh coffee (or strong tea) ready to brew!
I would love to hear from you! If you make this, send me a note, leave a review comment, or tag me on facebook or instagram @livingbreadbaker
I enjoy seeing how you share this bread with your family and friends.
Make sure to share this with someone who loves sourdough baking!
Just getting started with sourdough?
A competent guide transforms sourdough baking from overwhelming to uncomplicated and fun!
Get My Free Quick Start Sourdough Guide: Learn the key terms and concepts in sourdough baking, including the differences between active sourdough starter and sourdough discard, and how to care for your starter.
Start Baking Sourdough Confidently—Take the Intro to Sourdough Course for Just $27!
Time Planning Help for Sourdough Baking
The #1 need for sourdough bakers is help with time planning, so I created a resource for you.
Sourdough Time Planning Workbook: Perfect for new or experienced bakers, this workbook includes 8 templates ready to fill in and a baking journal. The templates cover 4 different ways to make classic sourdough country breads, 3 time planning worksheets for enriched sourdough bread depending on serving time target, and a blank template. The baking journal goes over baker’s percentages and how to take notes on your sourdough bakes.
Get a free sample of the workbook: Use this sourdough time planning worksheet sample to simplify your baking.

Living Bread Baker posts mentioned
Recommendations for learning sourdough
When is sourdough bulk fermentation finished?
When is sourdough finished proofing?
Easter sourdough bread recipes
Shop this post
4-qt. Cambro container and lid set
Celebrate with Bread Baking book
FREE Sourdough Quick Start Guide
My Intro. to Sourdough online course
This post contains affiliate links. Read my policy here.

Sourdough Kanelbullar
Equipment
- Food Scale
- large bowl
- Spoon
- plastic dough scraper
- 2 Baking Sheets
- Parchment Paper
- 2 small bowls
- Rolling Pin
- rolling pizza cutter or knife
- Pastry brush
- Cooling Rack
Ingredients
For the starter
- 30 grams sourdough starter 2 tablespoons
- 100 grams water ¼ cup plus 3 tablespoons
- 100 grams all-purpose four ⅔ cup
For the dough
- 200 grams whole milk 3/4 cup plus 2 tablespoons
- 30 grams water 1/4 cup
- 200 grams active starter about 2 cups
- 30 grams white cane sugar 2 tablespoons
- 500 grams all-purpose flour 3 1/2 cups
- 70 grams unsalted butter softened (5 tablespoons)
- 6 grams salt 1 teaspoon
- 2 grams ground cardamom 1/2 teaspoon
For the filling
- 65 grams unsalted butter at room temperature (5 tablespoons)
- 100 grams white cane sugar ½ cup
- 7 grams ground cinnamon 2 teaspoons
For the egg wash
- 1 large egg
- 1/8 teaspoon water
- 2 tablespoons pearl sugar or sliced almonds optional
Instructions
- MAKE THE STARTER: About 6 to 12 hours before mixing your dough, combine the starter or yeast, water, and flour in a clean container. Cover and leave at room temperature. Once active, it will double in volume and become full of large bubbles.
- WARM THE MILK: Heat the milk until it reaches a temperature of 110°F to 120°F.
- WEIGH THE INGREDIENTS: Making sure to tare after each addition, combine 200 grams of warm milk, 200 grams of starter, salt, and the sugar in a mixing bowl. Allow the sugar to dissolve, then add the flour and cardamom.
- MIX & KNEAD: Mix the ingredients together until they are fully combined. Turn the dough out onto a work surface and knead for 8 to 10 minutes by hand or 2 to 4 minutes with a dough hook in a stand mixer, until the dough is smooth, is no longer sticky, and releases easily from the bowl or work surface.
- ADD BUTTER: Slowly add the softened unsalted butter one tablespoon at a time. After each addition, knead the butter into the dough until it is fully incorporated.
- BULK FERMENT: Cover the dough and ferment for 5 to 8 hours, until doubled in volume.
- PREPARE THE BAKING SHEETS: Line two flat baking sheets with parchment paper and set aside.
- PREPARE THE FILLING: Mix the butter, sugar, and cinnamon together until smooth. Set aside.
- SHAPE: Place the dough on a lightly floured work surface. Dust flour onto a rolling pin and roll the dough into a 22-by-12-inch rectangle. Use a spatula to spread the filling evenly across the surface of the dough, leaving a ½-inch margin along the long sides. Fold the dough in half from the long edge and press to seal. With a rolling pizza cutter or knife, cut the dough from folded edge to sealed edge into 16 (1 3/8-inch) strips. Gently stretch a dough piece out and twist in opposite directions 4 times until it (about 8 times if only twisted in one direction), then twist one end around the other to make a loose knot shape. Press the edges of the strip underneath to seal. Place the knot on one of the prepared baking sheets. Repeat with the remaining strips of dough.
- PROOF: Cover and proof for 2 to 5 hours, until about 1½ times larger in volume. Touching the dough should leave an indentation when it is finished proofing.
- PREHEAT: Preheat the oven to 425°F.
- MAKE THE EGG WASH: Beat the egg and water together. Brush all over the kanelbullar knots to cover every crevice. Sprinkle with pearl sugar or sliced almonds (if using).
- BAKE: Place the first baking sheet in the oven and bake for 8 to 10 minutes, until the knots are evenly golden brown. Move the cooked kanelbullar to a cooling rack and move the second sheet of kanelbullar to the oven to bake.
- COOL AND SERVE: Allow the kanelbullar to cool for about 5 to 10 minutes. Serve fresh with coffee.


Hi, thanks for your recipe. I haven’t baked it yet. But recipe step 3 mentions cardamom. There is no cardamom in the ingredients list. Can you advise if this has been missed from the list?
Hi Mike, Thank you for that catch! It’s now listed correctly in the dough ingredients. I hope you enjoy baking them!
Hi!
I made this recipe and I’m really happy with the taste but my knots were a bit dry and crust-like on the outside. Don’t get me wrong, the dough on the inside of the knots were fantastic but is there a way to prevent a crust on the outside?
Hi there!
Thank you for trying the recipe! I’m so glad you enjoyed the flavor and the soft inside of the knots. For the outside texture, a few things can help keep them softer:
-Cover during proofing: Make sure the shaped knots are covered with a towel or plastic wrap so the dough doesn’t dry out before baking.
-Steam in the oven: Adding a small pan of hot water to the oven or giving the knots a light spritz of water right before baking can help keep the crust softer.
-Switch to just egg yolk + a splash of milk/cream → richer color, softer finish than a full egg wash.
-Skip the egg wash and brush with milk or cream instead → gives a softer, more tender exterior.
-Do the egg wash before baking, then brush with melted butter right after baking → you’ll still get that nice golden look, but the butter softens the crust as the knots cool.
That should give you that pillowy, soft texture all around next time!
Personally, I’d go with the steam option and the yolk and cream wash if I wasn’t getting my desired results.
I started making this recipe and measured everything in grams to be precise but the dough it’s extremely dry! To the point that I couldn’t even use the stand mixer and the flour was flaky and not forming a dough. What did I missed ? I triple check the instructions. 500 g of flour, 200 g of milk and 200 g of active starter it’s too dry IMO. It’s bulk fermenting now, I just hope it doesn’t go to waste. I wanted to use the stand mixer to make it easier but it was impossible. Please help!
Hi there, If dough is too dry, you need to add more liquid until it has a smooth appearance and looks and feels like the recipe recommends. It sounds like you tried your best to be accurate, but there is always room for subtle variation depending on starter consistency, flour choice, elevation, etc. If it feels too dry now it will not turn out as intended. This dough begins thick and slightly stiff but not at all dry so if that’s what you’re experiencing you’ll need to adjust. Add 10g liquid (water or milk) at a time, mix, and recheck. Repeat as needed.
Thank You, I love to eat sweet buns but I do not like the flavour of instant yeast. This is perfect.
I agree! Enjoy!!
Hello, the recipe calls for salt but I can’t find it in the method? Thank you!
Hi Kate, you can see the correction in the recipe. I hope you enjoyed the recipe!
Hello, where in the method do I add salt? Thanks
Thank you for pointing that out! It’s in step 3